Sunday, December 23, 2018

"Spring Breeze"--Ocean Beach Painting is a Christmas Gift

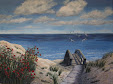
     "Spring Breeze", an 18" x 24" acrylic painting on gallery-wrapped canvas, has now been adopted. My sister and her husband had a spot in their new Maryland  home that they hoped I could fill with an Atlantic Ocean beach painting. I was thrilled to send them images of 5 available pieces in various sizes and palettes (some in shops and one still in our home). They chose "Spring Breeze", a scene at Jacksonville Beach, Florida about 14 miles from our home. The difficulties involved in satisfactorily completing this piece have made it more precious to me, and I'm thrilled that they will enjoy it and that it will stay in the family.

     I am delighted when family members or special friends accept the gift of a painting (or a hand-painted silk scarf--see earlier post about that). Although I would not take a chance on presenting someone with a painting they may not have chosen for themselves or which may not fit in their home, it is a true joy to give a painting away when I know the recipients like and want it.

     I hope you and yours have a meaningful and merry holiday season and that the joy of giving remains central in your lives. All of you who are faithful readers of this blog are a gift to me. Thank you for providing me the opportunity to share photos and thoughts with you, and a special shout-out to those of you who kindly share your own thoughts in response.

Question of the day: What is a gift you have received that seemed particularly precious or meaningful?

Friday, November 30, 2018

Deep Rose and Grey Hand-Painted Silk Scarf--Where Design Ideas Come From

Deep Rose and Grey Scarf before steam setting or removal of the gutta resist
     This 11" x 60" hand-painted silk scarf in deep rose and grey with white outline flower design sold so quickly after I completed the final finishing steps that I only have mid-stage photos. I think that's a happy reason for the lack of a better picture to show you! When the piece was completely finished, the colors were more intense, and the white outlines purer and brighter. 

     I'm often asked where I get ideas for my landscape paintings or hand-painted silk scarves. So, here is the story of the genesis of this scarf design. 

     Each of the scarves I make is a one-of-a-kind original. Although I sometimes adapt a previous design in a new color combination or use a motif from a previous scarf in a new way, there are never two scarves exactly alike. In fact, the nature of the hand-painting process makes creating duplicates impossible. The dye flows or blends differently each time; my free-hand sketching with the gutta resist turns out differently; etc.

     For scarf ideas, I keep a file of pages torn from magazines, catalogs, and other sources to page through to get my creative juices flowing. Sometimes, an unusual leaf or flower in nature or something in one of my own photos sparks a design element idea. I also have notebooks with rough sketches or descriptions of ideas that cross my mind. For this rose and grey scarf design, the initial source was a catalog picture of a black knit top with a large white abstract snowflake outlined on the front. Usually I outline motifs in gutta and fill in with a different color or colors than the background. This is the first time I have "drawn" with gutta resist on the blank white scarf but did not fill in the design to contrast with the background. Instead, the white outline stands out against a solid two-color scarf.

     The grey dye used had recently arrived from my supplier, Dharma Trading Company, with a couple of other new colors I'd ordered, and I was eager to try them. Rather than a single background color like the knit top in the catalog had, I thought I'd make a few bands of grey alternating with cranberry or burgundy. Another new color in my order was a darker burgundy with more of a brown undertone than I had expected. So, as I experimented on scrap white silk, I added enough light rose to the burgundy to make a color I liked with the grey.

     So, a new, one-of-a-kind scarf was born. I'll definitely use elements of this design again in other colors, with other motifs, or maybe similar motifs in different sizes or a different layout. Stay tuned. There are always more ideas in my inspiration file and design doodle and thoughts notebooks than there will ever be time to make.

Question of the day: Do you sometimes wonder how ideas for some of your favorite art pieces came about?


Wednesday, October 31, 2018

Two Beach Paintings--Two Different Palettes

"Early Spring Dune"
     Artist's choice of color, color temperature, and palette are significant factors in the mood and overall impression of a painting on the viewer. These two acrylic beach paintings are both based on observation and reference photos from Jacksonville Beach on the Atlantic in Northeast Florida. Yet, they evoke different feelings, at least partly because of different color palettes. My style, an interpretive realism, does not attempt to copy what I see, but to represent my feeling and impression of the natural scene, so I sometimes modify colors.

     When I first began painting, I tested colors and color combinations but did not restrict the palette for a given work. I chose tube colors and various blends of those colors according to the scene and my inclination. Later, when I learned to limit the palette for each work, the results were much more unified, cohesive, and pleasing (at least to me).

     The first painting, "Early Spring Dune" with a view outside the white wall of an oceanfront home and yard, has stronger, clearer, warmer hues, as well as sharper edges than the second. The palette included: Cerulean blue, Paynes grey (which is bluish), Sap green, cadmium red deep, burnt sienna, Naples yellow, buff, white, and a touch of black in a few shadow mixes.


"Sea Oats"
     In the second piece, "Sea Oats", a softer light glows from a partly cloudy sky later in the day. Considerable artistic license inspired this palette because the reference photo was taken on such a grey day that it almost looks like a black and white print. Memories of mature sea oats at different times of outdoor study informed my color choices. The palette for this work included: cobalt blue, Paynes grey, permanent rose, yellow ochre, burnt umber, buff, white, and a bit of black. The hues were softened by blending some with their complements or with gentle neutrals. You may notice that the blue and yellow chosen are cooler than those for "Early Spring Dune". Using permanent rose was a mistake for this piece, by the way; although a lovely shade, it is strong and can be difficult to handle. Regarding the choice as a learning opportunity, I blended the rose into submission, practicing on heavy art paper until the result worked.

     Same off-shore island, different paintings. You may prefer one or the other, but I enjoy exploring a range of palettes and always keep a record of each painting's palette in the file with my reference photos, sketches, and a photo of the completed painting. Those files have sparked many new adaptations of previously used palettes.

Question of the day: What differences do you notice in your response to the two paintings?      

Sunday, September 16, 2018

Brown, Rust, and Beige Hand-painted Silk Scarf Using Shibori Technique

     Using two new dye colors from a recent order as well as a deep brown already in my stock, I experimented with another Shibori technique somewhat similar to the flag fold technique I used for a coral toned scarf. I was delighted with the results--once again a complete surprise for me as a newbie to this style of silk dyeing. In fact, I couldn't wait to show this scarf to you. The dyes still need to be steam set, which will make the colors even richer. Then the scarf will be ready for its first thorough washing and careful pressing. Here, it still sports its Shibori folds.


center section detail
     The scarf's rich tones resulted from two factors. One is the inherent beauty of these French silk dye colors. The other was my concern that the dyes were not penetrating deeply enough into the folds, leading me to soak certain areas with additional dye. For this scarf, I was trying to color it all, not to leave any spots white.

     These techniques are wonderful and sort of magical. The dye flow follows the folds and settles more heavily on the edges of the folds as the silk dries. I do not think that even an experienced Shibori artist could control or predict the exact design results. With less color saturation, this particular folding pattern produces a simpler chevron design. Obviously, my heavier use of dye resulted in a more complex final pattern.


detail from one end
detail from the other end
     A few more details for those of you who are interested in my process: I folded this 11" x 60" silk scarf lengthwise just four times rather than the six times used on the coral scarf. Then, the diagonal folds were made in a back and forth triangular pattern rather than the flag fold used on the ends of the coral scarf. Each fold was pressed as I worked. The result was a long folded strip rather than the triangular packet of the flag fold technique. I folded the strip in half lengthwise, soaked it with water, and placed it in a large aluminum foil pan to dye. Soaking a brush (about 3/4" wide) in one color after another, I saturated various areas, some larger than others. The scarf air-dried for more than 24 hours. When I unfolded it, magic!

     There is a link to an earlier post about the flag folded coral scarf above. One other Shibori inspired scarf using a twisting method stars in another previous post. Both posts credit the author and book that guided my experimentation; this brown, rust, and beige scarf also followed directions from that wonderful book, adapted my own way.

Question of the day: My landscape painting and silk scarf dyeing and painting give me a variety of creative experiences, some mostly under my control and some free form and surprising like Shibori dyed scarves. Do you prefer one kind of creativity over the other--loose or controlled? I thrive on both.


Thursday, July 19, 2018

A Favorite Painting Technique Book


     The Simple Secret to Better Painting by Greg Albert inspires and teaches me something every time I pick it up. This book comes home from the public library every now and then so that I can find a new idea in it--or remind myself of helpful ideas that are easy to forget as I paint. 

     Today's post is rewritten from an entry I made in 2013. This super book came to mind today as I drove to the library, so I picked it up while I was there and decided to post about its wisdom again for new readers--and longtime readers as well.

     Greg Albert's "simple secret" is the wonderful lesson of variety within balance, which I consider a metaphor for a meaningful life as well as a basic principle for painting and other visual arts. His simple secret, which he calls the one central rule for design is: "Never make any two intervals the same." There is a wealth of valuable information contained in his applications of this rule. If you have any interest in the visual arts or in any facet of design, this book is worth reading and rereading.
"Sea Oats"

     Mr. Albert uses painting examples to expand his simple rule to intervals of distance, shape, tonal value, color, and more--no sort of interval should be the same, he maintains. This advice is helpful at all stages of a creative process. Here's an example. One of my recurring mistakes is to paint too much in mid-tone values--without fully realizing it along the way--rather than to include enough areas of more intense dark and very light values to balance the mid-tones. 


     In my more recent paintings, I started with a tonal value sketch, but sometimes still ended up with insufficient contrast. During my revision process, the value range often has needed to be extended. Mr. Albert's rule is a reminder to include a broader value range as well as to make sure that the areas (or "intervals") of dark, light, and mid-tone should not be the same in overall size. A previous post about a painting called "Sea Oats" shows one example of revision that included adding some very light clouds and brightening light areas on a dune as well as deepening just a few very dark highlights.
Hanna Park reference photo
"Hanna Park Heron"

     Another painting that required some added interval variety was "Hanna Park Heron"  (the colors in the photo of the painting are less intense than in the actual painting), shown here with the original reference photo (more about this painting was posted earlier also). Notice how the reference photo's background vegetation repeats types of plants, shapes, colors, and sizes equally--not ideal for artistic composition. Then, notice the additions of the two light grey dead trees to change that sameness and to provide strong verticals across from the large palm trunk. You will be able to spot other changes from the reference photo and to consider my possible reasons for them.

Question of the day: What does an idea like "variety in balance" bring to mind for you?


Saturday, June 30, 2018

Hand-painted Silk Scarf Gifts--Learning to Let Go

A gift a dear friend chose
     I have enjoyed giving some of my hand-painted silk scarves and landscape paintings to family and friends over the years. Giving is a joy to me, and sharing art I have made is a unique pleasure. Of course, it's a thrill to sell paintings or scarves, but right now, I am not marketing my work aggressively. So, even though I work quite slowly, I have a number of creations to share. 
For a precious extended family member
For a creative friend
For a dear relative who wants to frame it

     Since creating hand-painted silk scarves is relatively new to me, I am still experimenting and learning. Many are not planned for the colors and styles I would wear. Instead, they are created to help me grow in using the medium and to try a variety of colors, designs, and techniques. Today's post shows
a few of the scarves that I have given away. There are a number of others, but  it seems I didn't take pictures of all the scarves I made early on so can't show you all that became gifts.
For a fun college friend--a super reconnection

     It can be uncomfortable for people to be given art pieces that may or may not fit their lifestyle or preferences. Thus, I normally ask first or offer a choice of what is available with the understanding that it absolutely will not hurt my feelings if there is nothing in the current "stock" that the friend or family member wants at that point. There will always be more another time.

     Sometimes (especially with scarves), there are a couple that I really like myself. Occasionally, I am torn--truly wanting to offer the chosen item (or it would not have been among those displayed as possible gifts) and yet finding I don't quite want to part with the particular one someone chooses. It's a good lesson in letting go, and the joy of giving certainly overshadows any small reluctance to say good-bye to my creations.

Question of the day: When has giving been an unusually joyful experience for you?


Tuesday, May 29, 2018

Coral and Rose Hand-painted Silk Scarf Using a Shibori Technique


The completed silk scarf
     This hand-painted silk scarf was an experiment using a technique derived from traditional Japanese shibori silk dyeing methods. For the 60" x 11" silk scarf, I chose three dye colors, an orange-toned coral, a mix of coral and yellow, and rose. 

     To make this design, I accordion-folded and ironed the blank white scarf lengthwise in 6ths and then folded it back and forth in triangles somewhat like the ceremonial folding of a flag, ironing the folds as I worked. I used wooden clothespins to clip the three corners and hold the folds in place. The exact directions (with diagrams) are in Fabric Surface Design by Cheryl Rezendes (from our wonderful public library). In a previous post, I showed you a scarf made by twisting before dyeing, the idea taken from the same book.
When scarf is first unfolded
Center section-vertical folds only

     Only the ends of the scarf were folded, which was not my plan, but happened because folding the entire scarf would have made too thick a bundle to handle. I knew that leaving a section in the middle simply accordion-folded would also create a nice effect and would give the scarf some variety. 

     Also an accident (this was my very first effort at a folding technique, after all) was the different color saturation of the two ends of the scarf. After making and clipping the flag folds, I set one edge of the folded triangle in a flat dish with about 1/4" of dye in it (as the book directed). It all promptly fell over, soaking that part in coral dye. I quickly pulled it out and used a brush to soak each of two sides of that triangle with each of my other colors (on top of the unwanted extra coral). On the other end, I just saturated the three edges, each with one of the three colors (no dish of dye=no danger of the bundle taking an unintended swim).
The end that "took a bath" in coral dye
The second end completed--brushed on color only

    Finally, I brushed a generous amount of dye on the edge of each long strip in the center section and let the whole thing dry for a couple of days. 

     I enjoyed this experiment and will be better prepared to make a future scarf using the flag fold technique--perhaps one with only 4 lengthwise folds and with different colors.

Question of the day: What recent creative experiment have you enjoyed?

Monday, April 30, 2018

Make-ahead Comfort Food--Italian Sausage & White Bean Casserole

Casserole made ahead; still needs bread topping
     We like casual, unfussy meals with good friends. Recently, we enjoyed a favorite healthy casserole with long-time friends who were in our area. It was truly a treat to see them, and the last thing I wanted was to be tied up in the kitchen. A favorite make-ahead casserole was the answer. This dish has also been perfect to bring to friends and neighbors after a death in the family or at any other time of difficulty.

     The original recipe was in Woman's Day magazine, but I have made a few changes. I'll give you my version, but you may adjust the recipe according to your taste. It's a forgiving dish that will accommodate your changes, too. We served it with a spinach salad and had ice cream and purchased cookies for dessert. With the bulk of the cooking done the day before, the rest was simple, and I didn't miss out on our time together.

     To see the other recipes I have posted on this blog (something I do from time to time), see the blog recipe index here.

ITALIAN SAUSAGE & WHITE BEAN CASSEROLE

Serves 8 or more.                               Bake 350 degrees for 25 - 35 minutes.

1 1/2 lb. turkey Italian sausage    
3 leeks, white & light green parts  
6 - 7 medium carrots, peeled and sliced
3 cloves garlic, chopped                 
1/2 cup dry white wine
1 28 oz. can crushed tomatoes
2 15 oz. cans cannellini beans, rinsed                      
1/2 cup fresh parsley, snipped        
4 cups coarsely torn crusty bread    

Cook sausage in large skillet in 1  Tbsp. olive oil until browned, 6 - 8 minutes. Transfer to a plate. Preheat oven to 350 degrees. 

Slice leeks into half moons, rinse out soil in a bowl and drain in colander.

Saute leeks and carrots in 1 Tbsp. oil in same large skillet, stirring often until beginning to soften, about 5 minutes. SLICE THE SAUSAGE WHILE VEGS COOK. Add garlic; cook all another 30 seconds.

Add wine; cook for a minute. Add tomatoes and their juices; bring to a boil. Stir in the beans, sliced sausage, dash of salt, and 1/4 tsp. pepper. 

Stir in snipped parsley and transfer all to a large baking dish (3 1/2 - 4 quart casserole or 10" x 14" flat baking dish).

In a bowl, toss torn bread with 1 Tbsp. oil and sprinkle over the mixture.

BAKE AT 350 DEGREES FOR 25 - 35 MINUTES, UNTIL BUBBLY AND BREAD BROWNED.

TO MAKE A DAY AHEAD, stop after transferring cooked mixture to baking dish, cover, and refrigerate. Tear bread and put in a Ziploc bag. Day of serving, let dish come to room temperature, if possible. Toss torn bread with oil, top casserole, and bake as directed. It may take an extra 10 - 12 minutes. If dish is very cold, you may begin baking it without the bread and put it on later so that the bread does not burn while the rest of the ingredients heat up.

Closer view before topping with bread and baking


     As you can see, I took photos the day I made the dish and forgot to take another to show you the beautiful results with the crusty, browned bread on top. Sorry. Please don't go by the photo and forget the bread on top. I hope you enjoy this tasty meal.

Question of the day: Do you have a trusty, make-ahead meal?


Saturday, March 31, 2018

Coral and Olive Twist--a Hand-painted Silk Scarf

Coral and Olive Twist Hand-painted Silk Scarf
     I made this silk scarf in coral, sage, and olive hues by a different method than my usual technique of painting on a scarf stretched on a frame. For this scarf (and one other I'll show you soon), I used twisting or folding techniques that do not require a stretcher frame.

Another view, before the scarf was steam-set and pressed
     The technique came from a library book. The "Fold and Color" chapter in Fabric Surface Design by Cheryl Rezendes (published in 2013) presents step-by-step guidance for a number of  designs--some have roots in Japanese shibori hand-dyeing and others are reminiscent of tie-dyeing. 

     For this scarf, I twisted a 60" x 11" plain white silk scarf tightly (the author suggested fastening one end to something; instead, I asked my husband to hold one end while I twisted the other). Eventually, the twisted scarf began to fold in on itself; at that point, I folded the twist in half lengthwise and secured the ends together with a rubber band.


Detail view
     Placing the twisted bundle on a plastic tray, I then used an eye dropper and sometimes a brush full of paint to drop coral and olive dyes alternately (but not in a perfectly even pattern) on the folds of the twist. I soaked the areas well with dye, but with uneven saturation. Sometimes I let the colors run together, which I knew from earlier testing made a nice brownish hue. Of course, I turned the twist over and made sure all sides had adequate dye.

     After letting the scarf dry thoroughly (it took a couple of days until I had time to go back to the project; it was probably dry after 24 hours or so), I opened it out to discover the pattern you see here. Since I used French silk dyes, the scarf required steam setting, so I waited until I had 3 other pieces to make a batch. Then, I steamed, washed, and pressed it.

     For those interested, I obtain all my silks, French silk dyes, and other tools and supplies at Dharma Trading and have had excellent service from them. These two colors, Olive Green and Coral Red, are Tinfix brand, made in France by Sennelier. Some of my dyes are made by Dupont, a former French company I believe is now in Belgium.

Question of the day: Do you haunt the library and sometimes find fun how-to books there, or do you use information or videos from the internet--or both?

Sunday, February 18, 2018

Ocean Painting-- "Clouds Moving In"

"Clouds Moving In"

     Jacksonville, Florida's Atlantic Ocean beaches are long, wide, and ever-changing. The fascinating coastal skies also change often and look different every time we visit--we love living near this natural magnificence! 

     "Clouds Moving In", a 14" x 11" gallery-wrapped acrylic painting, portrays a late morning moment seen on a walk headed away from other beach goers. Happy to have a stretch of beach to myself, I took some reference photos and made notes about colors in the sky and water and the shifting shapes of the restless clouds.

     In previous ocean-front paintings (except for a sunrise scene painted for our son and his wife), I usually included dunes, sea oats, walkways, or other additional features of interest. This time, I wanted a view simply of beach, ocean, and sky with the focus on clouds building in the sky--a scene with its own kind of challenge in the simplicity. Preliminary sketches tested various composition possibilities. 


     Other projects (and life events) interrupted the painting process a few times. Periodic uncertainty about what to include and what to leave out also slowed the process, but I have finally decided (even with lingering uncertainty about a few aspects) to declare the piece "good enough" and "done". The seabirds rising were the final touch, adding a bit of life and movement to the scene.

     The palette for the work let the cool colors dominate with warmer tones in the sand and tinting some of the clouds. I used ultramarine and cerulean blue, Paynes grey, burnt sienna, and titanium white with touches of cadmium red light and cadmium yellow medium in some of the mixes.

Question of the day: Is it sometimes difficult for you to decide when a creative project is good enough to call "done"? 

P.S. Sorry the first link above ("previous ocean-front paintings") scoops up so many blog posts, some not as relevant as intended. I couldn't find a way to winnow them down, but feel free to take a look. A quick scroll through the batch will find any that might be of interest to you.


Wednesday, January 31, 2018

Purple Tulips on Blue Background, a Hand-painted Silk Scarf

Blue hand-painted silk scarf with purple tulips
     Newly completed, this 11" x 60" hand-painted silk scarf features purple and purple-variegated tulips on a rich medium blue background. The clear green leaves add even more versatility in terms of coordinating it with various outfits.

     For those of you who are interested, I'll outline the steps of the painting process for this scarf next.

     After some careful study of tulip photos in botanical books and referring to some outline drawings (free for anyone on the Internet), I drew my own outline designs of stands of tulips on heavy paper in the exact size of the intended scarf designs--one for each end of the scarf. Then, using the drawings as a guide, I "drew" onto the scarf with a small squeeze bottle of gutta--not an easy process (see more about gutta below). The blank white scarf is stretched on a frame while I work on it.
Closer detail of one end
Closer detail of the other end

     Once the gutta dried, I painted the first layer of color in the outlines of the leaves and the solid purple tulips. Next came gutta-drawn details inside the outlines (to divide the individual tulip petals and the various leaves from each other). Then I added further layers of color to deepen the tones, shade some areas, and differentiate the details (the French silk dyes I use stay semi-transparent up to 6 or 7 layers of color). The variegated tulips required smaller strokes of color which were then blended out with a water-soaked brush.


A different view of the scarf
     In these photos you see the scarf completed up to that point. The final steps will take several more hours of work. I will wrap this and four other hand-painted scarves in separate layers in heavy newsprint (very carefully to avoid steam-set creases) for an hour or more of deep steaming to set the dyes. 

     Then I'll remove the gutta resist that outlines the design. Gutta (a rubber based resist) protects a design or separates areas from each other, preventing colors from running together. It can only be removed by dry cleaning or (what I do) soaking in a jar with naphtha. Finally, I'll wash the scarves in a special, gentle liquid soap, dry, and press them. Whew--one-of-a-kind, hand-painted silk scarves ready for someone to wear.

Question of the day: There are many styles of blog posts. Mine combine photos and a fair amount of text. Are you a blog visitor who prefers to look at photos quickly and maybe a sentence or two, or do you enjoy more text for the times you are interested in some explanation?