Saturday, December 13, 2014

Blog Hop, Part II--My Creative Process

A great blue heron, seen at  Jacksonville's Hanna Park
Somewhere in Michigan (a scene from memories)

     Thanks again to Mary Paquet for the invitation to contribute to the blog hop project by responding to four questions. I continue here with the two last questions (see my previous post for Part I). And don't miss Jo Castillo's post on Monday, Dec. 15; I "tagged" her to be next in the blog hop and know that you will enjoy her lively creative sense and fine art works.

3) Why do I create what I do?

     I have always enjoyed sewing, knitting, and crocheting, but did not believe I had any talent for the visual arts I so admired. My love for color and for the beauty of the natural world kept tugging me toward giving landscape work a try.
Castaway Preserve Cedar
Castaway Preserve Palms

     Finally, about 11 years ago, I signed up for a week-long class in acrylic painting at the John C. Campbell Folk School in North Carolina--expecting to enjoy playing with color and making creative messes, then to toss them and return home renewed and relaxed. Well, with an excellent teacher and time to practice and learn, I painted pieces that I really liked. No tossing occurred, and I was hooked! Now, with more workshops and lots more practice behind me, some pieces even sell. More importantly, I find continued delight in creating acrylic landscapes and learning more all the time. Another Folk School class this year started me in silk painting as well--a fluid, often unpredictable medium that gives me additional pleasure. Creating art is a whole new world for me and a rewarding pursuit in semi-retirement.
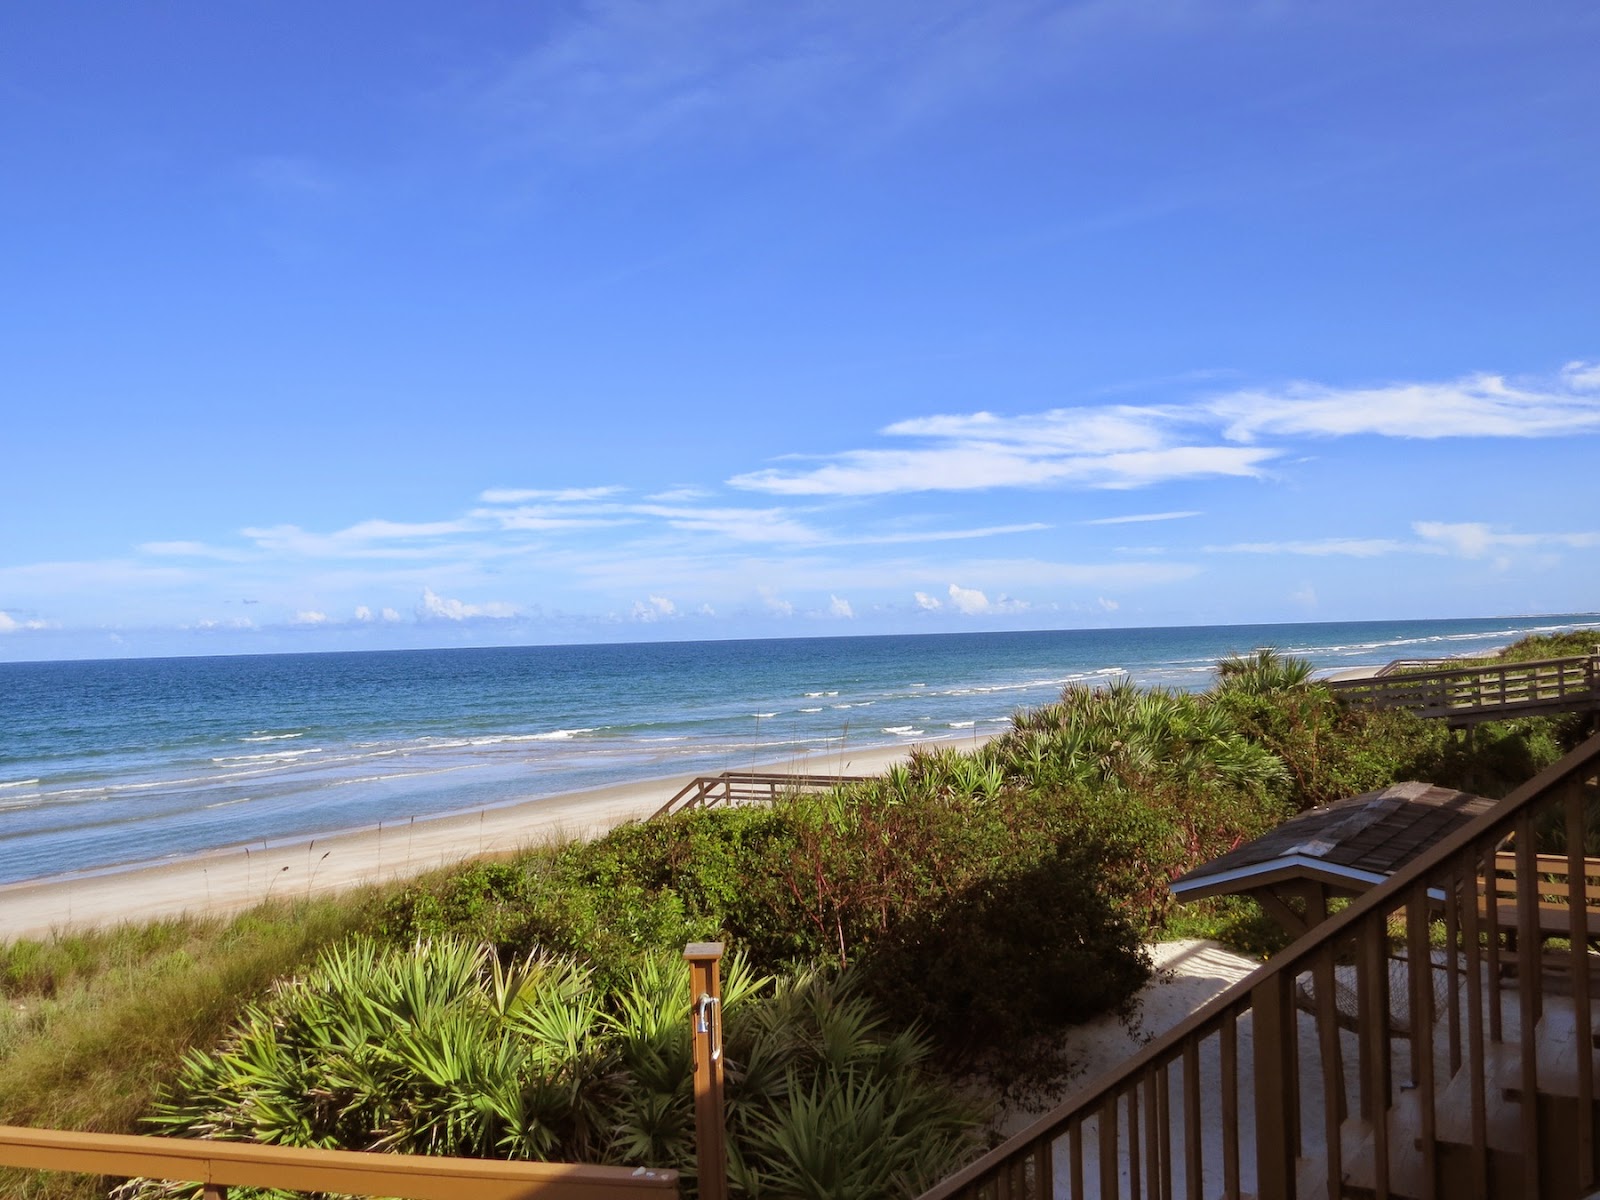
Jacksonville Beach
Jacksonville Beach

4) How does my creative process work?

     While considering this question, I used the little search box at the top of my blog and entered "painting process". Oh, my--I have written many posts that include discussion of the creative process in general and of the particular processes involved in individual paintings or silk scarves.
An early work--A favorite retreat near Warwick, NY

Silk scarf (using resist)
Silk scarf (natural blending--no resist)
     So, what are the common threads in varying processes for individual pieces? For processes in making the silk scarves, please see recent posts on that topic.
     
     Nearly all landscape paintings begin with a photo or a cluster of reference photos. Since I am endlessly fascinated with coastal North Florida scenes and want to convey the beauty and serenity I find in exploring out-of-the-way places in this area, I study angles of light, color (how to capture the incredible range of greens?!), and take notes to accompany the photos I take from various angles and distances.

     In the studio, the next considerations are composition (including tonal balance--the lights and darks) and color palette. In our area, good composition almost always involves leaving out some of the lush growth and sometimes other elements. Sketching--very roughly--a few possible versions of a scene, sometimes moving the point of view or focal point, helps me decide on a final version. Here are some previous posts that discuss composition.

     Choosing a limited number of colors helps both in unifying a painting and still gives an incredible range of possible hues. I don't try to match the actual scene so much as try to capture a feeling while staying in a realistic color range. Sometimes I go for low contrast and cool serenity, sometimes warmer, lively vistas. Again, here are some previous posts with more about color and palette for interested readers.

      Revision is the other most crucial piece of my process. The beauty of acrylics (especially for a learner like me) is that they dry quickly and cover well. I can paint over an area that does not please me, take out a superfluous bush, or whatever. Sometimes before a major change, I try it out by cutting a shape out of construction paper that approximates the change, tape it to the canvas, and squint to judge the effect on the composition.

     When wrestling with a piece that is not cooperating, it helps to remind myself that any work is a valuable learning experience (taking myself too seriously is fatal). At times, I put a painting away for a time and work on something else. A fresh look later on often yields a solution.

Question of the day: Do you enjoy hearing about the creative process or watching artists work? Or would you rather simply experience the art for yourself with no background or explanation given?

Monday, December 8, 2014

Around the World Blog Hop Entry--My Creative Process

   
Outside a back yard at Jacksonville Beach, FL
I was invited to join an Around the World Blog Hop (google that and be amazed!) by fellow artist Mary Paquet, whose work and blog I always enjoy and admire. Please visit Mary Paquet's blog to see for yourselves and for her Blog Hop entry on December 1. In turn, I have invited Jo Castillo, a delightful, talented artist and prolific blogger to post on Monday, December 15. All the past blog hop entries I have visited are fascinating as a variety of artists each answer four questions about their work and creative process.

     The invitation is welcome both because 1) I am a relatively new artist and 2) my blog is a mix of posts about both acrylic landscape painting and silk scarf painting AND lots of other aspects of creative living, including travel, cooking, exploring coastal North Florida, and more. I am honored that more established artists with more art-focused blogs to include mine. Thank you, Mary Paquet. My thoughts on the questions appear below (and, to spare you a truly endless post this time, will continue in a second post in a few days). Here and there a link will take interested readers to related posts on this blog. 

1) What am I working on? After a break from art due to travel, time with family and, well, the rest of life, I have several projects going now:
Matanzas River Bend
  • finishing touches on a gift for a friend--a 12" x 6" piece picturing a Matanzas River scene, just off the Atlantic Ocean. My friend has always loved the Matanzas Inlet area, near St. Augustine, Florida.
  • deciding what's next on a half-finished silk scarf with a purple iris motif; it needs more tonal contrast and/or some other revision (not pictured--stay tuned).
  • designing and making a scarf for a friend who wants it as a Christmas gift for someone special to her. She has a color scheme idea, and is trusting me for the rest. How scary is that?
  • A favorite scarf, painted in March
  • Finally, something new for me, planning a couple of paintings based on photos and memories of a recent time in Tuscany. Normally, I interpret scenes here in coastal North Florida because I know this area in depth. Can I capture the essence of a place only visited? Perhaps not, but I am hoping to convey my own impressions and appreciation of its beauty.
2) How does my work differ from others of its genre? Most bloggers, including me, regard this question as a stumper--hard to answer for oneself. Even some relative strangers have said that once they see a landscape I've painted, they recognize others as being my style, so the work does have distinctive elements. However, defining those elements is difficult. I'll mention a few common threads in most of the landscapes. Making scarves is simply too new for me to have developed a personal style; "experimenting" is the current mode in silk painting. (See posts on the week-long "art camp" silk painting class I enjoyed).  My landscape paintings usually include:
Another silk scarf favorite

  • A realistic style--although I "edit" actual scenes for good composition; they are far from photographic.
  • Many portray out-of-the way places that most people would pass without noticing. Prowling back roads, urban pocket parks, and nature preserves with my camera, I find quiet charm and beauty--painting ideas abound.
  • Water appears in a fair number of works. Here in Jacksonville, Florida, we enjoy the Atlantic Ocean (from a surprising variety of beaches), the mighty St. Johns River and a number of other rivers, quirky creeks (some of which would be called rivers in other regions--they are wide!), still ponds, and our bewitching, ever-changing salt marshes. I love both being near natural bodies of water and the challenge of painting water.
  • Marsh in Fort Caroline Preserve
  • Finally, the works reflect an effort to establish a clear focal point and visual path for the viewer.
Clear focal point, "Summer Reflections" 
3) Why do I create what I do?

4) How does my creating process work?

This post is long enough, so--hoping the blog hop police won't mind--I will post again in a few days with consideration of the last two questions.

   Don't forget to visit the delightful blog of fine artist Jo Castillo, who has agreed to be "tagged" as the next Monday blogger in this creative chain. Don't miss her post on December 15! 

Again, I am truly thankful to Mary Paquet for providing this opportunity. Given the many incredible blogs I have discovered following the chain from one creator to another, it took real self-discipline to stop browsing and post on time :).


Question of the Day: What are some delightful discoveries of people/ideas/visuals/blogs you have encountered recently as you browse the web?    

Friday, November 28, 2014

How to Pack Light--2 Weeks in Italy with One Carry-on and One Small Backpack

Tops: aqua rain-resistant jacket, in ivory color: a turtleneck, half-sleeve shirt, and long-sleeve jewel neck, sage long-sleeve knit, beige short sleeve knit, lightweight v-neck sweater, cable cardigan, rust short-sleeve knit (forgot to include in photo).  Bottoms: grey knit skirt, black jeans, grey slacks,  silky black pants. Also: scarves and black shoes.
     Packing light requires creativity, planning, and courage. Why courage, you may ask? For me, it requires courage because I like to be prepared for all possibilities. I need to radically pare down that "What if I need this?" pile in order to travel easily and lightly. The photo above shows the pieces that made the cut for two weeks in Italy in October. These clothes (plus, socks, underwear, nightshirt, etc.) easily fit into a small, wheeled carry-on case (20" x 13 1/2" x 9"). I also packed a sturdy tote bag that folds flat in case we bring home souvenirs and gifts beyond what will tuck into our luggage. If we carry an extra tote, of course, we need to check one larger bag. The small photo shows the comfy knits I wore for the flight plus the fleece jacket I carried.


Worn on the plane
     Instead of trying to pack enough different outfits for every day of the trip, I plan a flexible group of clothes, knowing that I will need to wash a few things along the way to wear again. When we will be in the same room at least two days, I may wash (using a few drops of shampoo) a shirt, a bit of underwear, and some socks--maybe even one of the lightweight pairs of pants--and hang them to dry. To me, this is simpler than dragging around a heavy bag with twice as many clothes; most of it just dirty laundry after the first few days. For longer trips, we pack the same number of clothes and either find a laundry that will wash, dry, and fold a load for a reasonable price per kilo, or we use a do-it-yourself launderette.

My luggage--lightweight and compact
(see the yardstick behind the wheeled case
for an idea of its size)
     My small backpack carries my toiletries, curling iron, medicine, Kindle tablet, logic puzzle book, small camera, chargers, and other small personal items. Since I usually carry the small backpack for sight-seeing with water bottle, camera, map, guidebook pages, emergency rain slicker (the cheap dollar store kind), etc., I do not use a purse when traveling internationally. A small case in the bottom of the backpack holds one credit card and enough local cash for incidentals that day. For crowded tourist areas more prone to petty crime, I use a slim money belt that rides around my waist under my clothes for cash and credit card. The money belt also safely holds passport, train tickets, and other papers when we are in transit--say running through a train station.

     Most of us know the basics of assembling a travel wardrobe: mix and match pieces, layers if the weather will be variable, a simple neutral color scheme with a few touches of your favorite, most flattering color. Add a few accessories (for me, scarves and earrings) to vary the look of these few pieces. In addition, each piece MUST serve more than one need. For our October travel in Venice and Tuscany, Italy, we did not expect to need dressy clothes. If needed, I would have packed one washable dressier top to wear with the silky black slacks.

      Our luggage is from the Rick Steves (of public TV) store on-line. What they sell is very lightweight, sturdy and durable, and fits international carry-on standards. My wheeled case converts to a backpack when that is handier. My husband used a slightly larger (but still carry-on) Rick Steves backpack with no wheels or stiff frame. It holds an amazing amount and can be stuffed into an overhead bin with ease.

Question of the Day: What is your favorite tip for creatively traveling light?   

Saturday, November 1, 2014

October Travel in Tuscany--Gorgeous

     We recently returned from a long-anticipated (and long saved for!) vacation in Italy. Tuscany was the focus of our time there, with a few days in Venice before we joined an excellent AHI tour of Tuscan highlights. Over the years as we have dreamed of visiting Tuscany, I have considered various tours as well as the possibility of braving crazy Italian driving conditions and doing it on our own. This particular tour won me over immediately because one beautiful hotel was our home base--no packing up and moving several times to see various places.
     From our comfy nest at the Palazzo San Lorenzo hotel in the charming Tuscan hill town of Colle di Val d'Elsa, our delightful guide took us to a different destination or two each day. The excursions were varied and fascinating, from a sheep's cheese factory and tasting, to Siena and Florence, to an elegant winery, to tiny hill towns--each with its own distinctive history and charm--and to much more.

     The first four photos today show scenes in our home base in Colle, including the "new gate" (built in the 1200s--the center of town and its old gate further uphill are at least two centuries older) where we met the bus each morning.

     The other three photos were taken on a day trip to a couple of other hill towns. These images are from San Gimignano, a well-visited hill town with more medieval towers still standing than in most Tuscan towns. These towers were built by wealthy families, apparently to display their wealth and power. It was their form of competitive mansion showmanship. They may also have served defensive purposes at times. San Gimignano at one time had as many as 80 towers--14 still stand today.

     Even at midday, you can see mist partially covering
the tallest tower in the first San Gimignano photo. There was heavy mist in the valley that entire day, with sun breaking through on the hills. Atmospheric and lovely to see.


     According to legend, the Saint "San Gimignano" saved the hilltop fortress from barbarian invasions several times by miraculously calling in heavy fog to obscure the town and to confuse the enemies. The saint is credited with bringing Christianity to this area, which had been a Roman outpost, sometime in the 300s AD. The existing old city center and original walls date to the 1000s and 1100s. As at our other destinations, we enjoyed an informative tour of the town led by a local expert, then strolled on our own for some relaxed exploration before rejoining the group.
Question of the day: Have you traveled with a tour group? How do you feel about tour groups as opposed to travel on your own?

Thursday, October 9, 2014

Enjoying a Lovely North Florida Beach

     A few weeks ago, we enjoyed a most generous gift; some friends gave us a 3-night stay at a beautiful beach house nearby. Since it had 4 bedrooms (and 4 full baths--glorious luxury!), some family members joined us. Our Jacksonville son and his wife spent some time with us, and Mark's Wisconsin brother and wife flew down for the entire time. 

     Although I spent much more time playing than taking photos, I have a few shots to show you. Two show a sunrise, the misty moments before the sun came up and then the sun rising just enough to hide partially behind a cloud (otherwise, it is too bright on the horizon for easy viewing or for a good photo). 


    Other than that, I won't go on with description--it's a wonderful place, and we had a great time, including some successful surf casting by our sportsman Wisconsin brother. He caught two gorgeous Pompano, which I understand are becoming rare in our area.


     We are truly grateful for the gift of this relaxing and renewing time with family and for the beauty of our coast.

Question of the day: What is your home area looking like this time of the year?

Tuesday, September 30, 2014

Creations by Various Folk School Students, Quilts, Scarves, Wooden Trunks, and More--All Hand Crafted

     When we took a week of classes at the John C. Campbell Folk School in North Carolina, Mark in clay pots thrown on a pottery wheel, me in hand-painting silk scarves, we joined dozens of others in about 12 different classes. At the end of our time there, we all gathered for a show of the many creations produced by students during the week. The entertainment at the gathering included country and folk classics played by a string group from the fiddling class that also met all that week. 

     Seeing the results of the excellent teaching and focused student efforts was amazing and inspirational. A commenter on this blog to one of my previous silk painting posts (thank you, Rosemary) suggested that I must have been Donna Kassab's "star pupil". Not so! (although I appreciate the compliment) All the students' scarves were lovely. One of the delights of working in a small class with other creative people is observing their varied approaches to using the medium. The first three photos show the hand-painted silk scarves exhibited by our class members at that end-of-the-week show. Sadly, two women had to leave early, and their gorgeous scarves were not available for the show. Still, I think you will get a sense of the differing original designs, the use of color in varied ways--and, hopefully, get a taste of how stimulating it is to learn and create with others at this excellent "art camp for adults".

     The group that made wooden trunks had begun the weekend before, choosing the type of lumber each would use and beginning the rough assembly. Then, they alternated between the wood shop and the blacksmith shop completing the trunks and applying layer after layer of finish as well as hand-forging the hinges and clasps. You see one trunk made by the husband of a silk painter--he used red oak, and she painted a red oak themed scarf to display with it. 

     For the rest, you see lovely quilts displayed behind the trunks (each made in one week!), wood turning products, hand-made glass beads, and the gathering for our final ceremonies and celebration. Click on any photo to see it larger. Thank you for viewing this post; I have loved reliving a super time. For earlier posts about our silk painting class click here.


Question of the day: What sort of class would you take, given the chance?

Wednesday, September 17, 2014

Small North Florida Waterscape Painting--Matanzas River Scene

     This small painting of a view across the Matanzas River from a public beach near St. Augustine, Florida, is not quite finished. However, I decided to show you the present (nearly completed) version today. Life has been full lately, and it's hard to say just when there will be time to make the remaining adjustments I have in mind.

     The acrylic on gallery-wrapped canvas piece is 12" wide and just 6" tall, in a kind of panoramic format. One of my reference photos appears in a post from more than two years ago when my husband and I enjoyed an outing to this area and nearby Crescent Beach. You can see photos from that day and read an account of it here. The Matanzas River is tidal, flowing into the Atlantic Ocean near this beach through the Matanzas Inlet (out of sight to your left as you view the scene).
     
     When ready, the painting will be a gift for a friend who once lived on a boat in this area. I wanted to get her perspective on how well I have captured the feel of the sand, water, vegetation, etc., so showed it to her recently. It was gratifying to get her stamp of approval on my interpretation of this lovely spot. She mentioned the distinctive, slightly pinkish sand and other aspects of the scene she knows so well and felt that this little painting captured the right tones and feel. That was a good feeling, especially since it is for her :>) .

     At first, this piece was intended as both a stand-alone work and a possible preliminary study for a larger painting, but for now, I'm happy with this version and do not expect to paint another. It's time to move on (whenever I manage to reserve painting time again) and to begin a different coastal North Florida landscape.

Question of the day: When you see--or create--a painting of a familiar scene, do you prefer to see it fairly realistically portrayed, or do you enjoy visual interpretations that "bend" what's there for an artistic purpose?

Thursday, August 21, 2014

More Hand-Painted Silk Scarves

     I made the first two hand-painted, one-of-a-kind silk scarves shown in this post at the week-long "art camp for grown-ups" class I mentioned in a previous post. The Asian-influenced design in apricot and sage green was a learning experience on several levels. One of my first attempts to draw a design using resist to prevent the dyes from running together, it also was a hopeful stab at mixing colors to match outfits without having them in the room with me for comparison. Both the main colors are some favorites in my wardrobe, and I was thrilled when the results looked perfect with all the outfits I had in mind.

     The nighttime scene with moon and owl also arose from a desire to practice using resist to "draw" on white silk, then to paint inside those lines, and finally to fill in a freer style background. Two techniques produce the sky in the scene: some of the areas allow the colors to run together on their own, which produces uneven--sometimes jagged--lines while other areas used a quick rubbing technique Donna Kassab taught in the class to achieve blended tones (click on this, or any, photo to see more detail). The "stars" are simply dots of resist on the white silk before painting.

     The fuchsia and orange scarf began as a disaster. In the class, the result of painting the background waves of color was (in my view) garish. Believe it or not, the colors are considerably toned down now. Although some classmates liked the original, I decided to remove some of the dye right away and washed out the color 3 or 4 times. After the scarf dried, I took it home, uncertain how to finish it. Once I had all my equipment and supplies collected at home, I decided to use resist to draw sort of day lily type flowers in the corners and painted them with coordinating colors. I also restored some of the orange tones in the background. Sorry I don't have a better photo; I gave a couple of scarves away to relatives on a recent vacation, and this one was snapped up before it had posed properly. You see it here on the stretcher frame my long-suffering husband helped me make. The silks must be suspended and stretched for the painting and drying processes.


     Finally, the green/purple/yellow scarf, another version of my "Colorburst" design, is one of two I made for a friend who wanted to purchase a green toned scarf for a gift. She wanted some greens in the Colorburst design, but was somewhat vague on details, so I made two for her to consider. I don't have a good photo of the one she chose, but this is the other--the first scarf made entirely on my own at home. What fun all these projects have been!

Question of the day: Can you tell that my love of color is a key factor in my enjoyment of both silk and landscape painting? How does color bring joy in your life?

Thursday, July 31, 2014

Beautiful Gibbs Gardens in North Georgia

     When we were in Georgia recently to visit family and friends, we toured Gibbs Gardens. Our time there was renewing and inspiring, with truly gorgeous landscaped and planted areas as well as extensive natural hillsides, streams, and meadows. The day lily gardens were featured at the time we were there; visits at other times of the year feature whatever flowers are naturally in full bloom in that mini-season.


     I won't try to describe the many features or history of this delightful attraction. If you are interested, their web site is lovely and informative. The gardens are located less than an hour north of Atlanta, GA, in the triangle formed by GA 400, I-285, and I-575 (off I-75). We would highly recommend you see it for yourselves sometime--if you live anywhere near the area or if you travel through Atlanta in the future.


     I have been enjoying my creative everyday life in recent months, and apologize for not posting for quite awhile. Beginning now, I plan to resume blogging more regularly again--as well as making more faithful visits to the postings of blogging friends.

Question of the day: What flowers or flowering plants do you most enjoy?


Monday, April 7, 2014

Painting Silk Scarves Without Using a Resist Agent

     The two silk scarves pictured today are among several I made at "art camp". These two have been especially usable and fun to wear; they each coordinate with many outfits and brighten neutral-toned tops. Changing the corner that shows or tying the scarf in different ways features various colors according to whatever section of the scarf best complements an outfit.


     I did not use any resist agent to control the flow of dye in these two pieces. In other words, the dye was brushed straight onto the unpainted silk scarf and allowed to diffuse and spread naturally. Each stroke blends with other dye colors that have been brushed near them, often creating unplanned effects and varied edges (some jagged-looking, some smoother). These effects are delightful to watch and are both fun and challenging to work with in silk painting design. The rest of the post describes the painting process--including the use of salt and alcohol for special effects--for interested readers.

     The multi-colored scarf with yellows, oranges, and reds predominating evolved from my original plan to a somewhat different design. After blending each of the dye colors I wanted to use (in small cups), I began to brush the gorgeous colors in strips from the edge of the scarf toward the center. As you can see in the photo below, I did not bring the colors all the way to the center at first. To deepen the colors, I painted over some areas again once they were dry--sometimes with the same color, sometimes blending in another color. Then, as the final version of the strips of color dried, classmates began to comment on the design, calling it "like fire" or "fireworks". So, I went with that, rather than with the autumn theme in my mind (don't ask--it would be boring to try to explain). I completed the center with a burst of "fire", taking advantage of an interesting property of yellow dye. As our teacher, Donna Kassab, had shown us, yellow dye (who knows why) tends to "push" other colors back a bit in the silk. The yellow and yellow-orange blend in the center performed their magic and created an interesting jagged edge in the process. A bit of salt created some variation in the center (see next paragraph for more on using salt). Fun stuff!


     The green and blue scarf went even more quickly. I brushed the entire scarf with slightly varied green tones as a background. Once that was dry, I began in the center with ultramarine blue and brushed a large spiral shape (leaving a fair amount of open space). Then, I brushed shades of turquoise next to the blue, again leaving some space for the background green to show. Finally, for the "special effects"  of spots and mottling you see, I sprinkled the wet surface with table salt and some chunky sea salt here and there for variety. Lightly spraying alcohol from a couple of different angles completed the piece. Both the salt and alcohol continue to work until the silk is completely dry, either drawing the dye in (salt) or repelling it (alcohol drops). So again, the process took on a life of its own, partly unexpected, although--since I had some experience with the materials by that time--partly as I had hoped and expected.

Question of the day: Do you prefer creative processes over which you (at least mostly) exert some control, or do you enjoy using media which to some degree, drive the creation in unexpected directions?