Tuesday, September 21, 2021
Index to Recipes
A quick note regarding the pasta salad recipe and others. I have made an index to the recipes on this blog with links to each one. Enjoy browsing some other delicious dishes.
Fresh Herb and Vegetable Pasta Salad
This refreshing salad is healthy and delicious--great in the summer or anytime. Since it uses no oil, it is low fat and keeps well. I think leftover salad would keep in the refrigerator for a week, although it doesn't normally last that long in our house.
Pasta salad ready to enjoy
You can vary the vegetables and herbs to your family's taste. Dried herbs can work; just use half as much or less. The version here is my revision of a recipe I copied too long ago to remember the original source. I think it is from a cookbook I found at the library. See the notes after the recipe for original ingredients.
The vegetable/herb/vinegar mixture needs to be made anywhere from 2 to 8 hours ahead, so this dish takes some planning. However, it can be handy if mealtime will be rushed or if you are one of those super organized people who rises early and does some cooking before work (Hats off to you go-getters! I've done that, but it doesn't come naturally to me.;>) The remaining preparation is simple, just the 15 minutes or so it takes to cook the pasta. I usually boil a pot of water ahead, cover it, turn off the heat, and let it stand. That way, when I want to get the meal on, the water boils almost right away.
Fresh Herb and Vegetable Pasta Salad
Step 1. Combine in a large serving bowl:
about 12 oz. tomatoes, chopped (I use kitchen scissors)
1/2 cup or more sweet or red onion, chopped
 |
Step 1. Veg/herb mixture |
1 yellow bell pepper, chopped
2 cloves garlic, minced or pressed
3 Tbsp. red wine vinegar or cider vinegar
1 Tbsp. sugar
generous amount freshly ground pepper
1/3 cup chopped fresh basil
1 tsp. chopped fresh rosemary
1/2 tsp. dried oregano
dash salt
Mix well. Cover and refrigerate for at least 2 hours or for up to about 8 hours. An hour or so extra doesn't hurt.
Step 2. Shortly before serving:
8 ounces (about 3 cups dry) bite-size pasta twists or spirals such as rotini
Cook in 3 quarts boiling water (use a 5 or 6 quart pot) just until tender to the bite (12 to 15 minutes).
Step 3. 1 or 2 minutes before pasta is done, add:
2 cups frozen petite or baby peas
Return pot to boil just until pasta is done. Drain, rinse with cold water, and drain well again. Pour into the serving bowl with vegetable/herb mixture and mix gently, but well.
Step 4. Add:
2 Tbsp. - 1/3 cup shaved or grated Parmesan cheese
Toss well again and serve with additional cheese to add to taste.
Makes 8 side dish servings.
Notes: The original recipe called for green bell pepper (I like more colors in the salad) and 1 cup diced zucchini rather than the peas. If you use the zucchini, add it with the other vegetables and herbs in step 1. This is a good alternative if you cannot find frozen petite peas; I don't think I'd like the salad as well with regular frozen peas. Be creative with the vegetables you like best or have on hand. I use shaved Parmesan cheese, which doesn't completely melt, probably because the vegetable mixture is cold. You could stir the cheese into the hot pasta before mixing everything together.
Closeup of the completed salad
Question of the day: What is your favorite hearty side salad?
Thursday, July 30, 2020
Utter Frustration with Blogger!
I have worked a long time on a new post to show you another new hand-painted silk scarf. But Blogger has a new "interface" that does not work right. The new post keeps getting chopped off when I try to publish the post no matter how many times I have saved my work.
Is anyone else having trouble getting a complete post to publish? Do you have any suggestions for me? I will probably not be able to work on the post again for a couple of weeks, but I hope to come through with something for you then.
Is anyone else having trouble getting a complete post to publish? Do you have any suggestions for me? I will probably not be able to work on the post again for a couple of weeks, but I hope to come through with something for you then.
Rose, Pink, and Grey Hand-Painted Silk Scarf Using Shibori Technique
 OK, things are working better, but I don't know why this post appears after my earlier frustration rant. Today's date is August 31, 2020, and I'm thrilled to be able to communicate with you again.
 I am enjoying some new French silk dye colors and chose this combination of colors--rose, pink, and grey--to see how the new pink works. As expected, the rose is powerful enough to partially invade areas I had planned to be pink, but overall, I am very pleased with the results. Given that I don't look great in strong rose tones, this is a scarf made for someone else. We'll see who that turns out to be.
 |
| Close-up detail near one end |
Japanese shibori techniques like this one require a fair amount of preparation; then the actual application of the dyes goes quite quickly. For this design, I press lengthwise accordion folds in the scarf--in this case dividing the 11" width into fourths. In my first try--very much a learning experience--with this particular shibori design, I divided the scarf width into sixths. Making four folds works much better for the 60" x 11" scarf. After the four long accordion folds, I made angled folds in alternating directions and pressed them in.
 |
| Detail near other end |
Finally, I soaked the folded strip with water to help disburse the dyes and applied my chosen colors with well-loaded brushes, pushing the dye into the folds. A more complete description of this particular shibori process to create a brown, rust, and beige scarf is in a previous post.

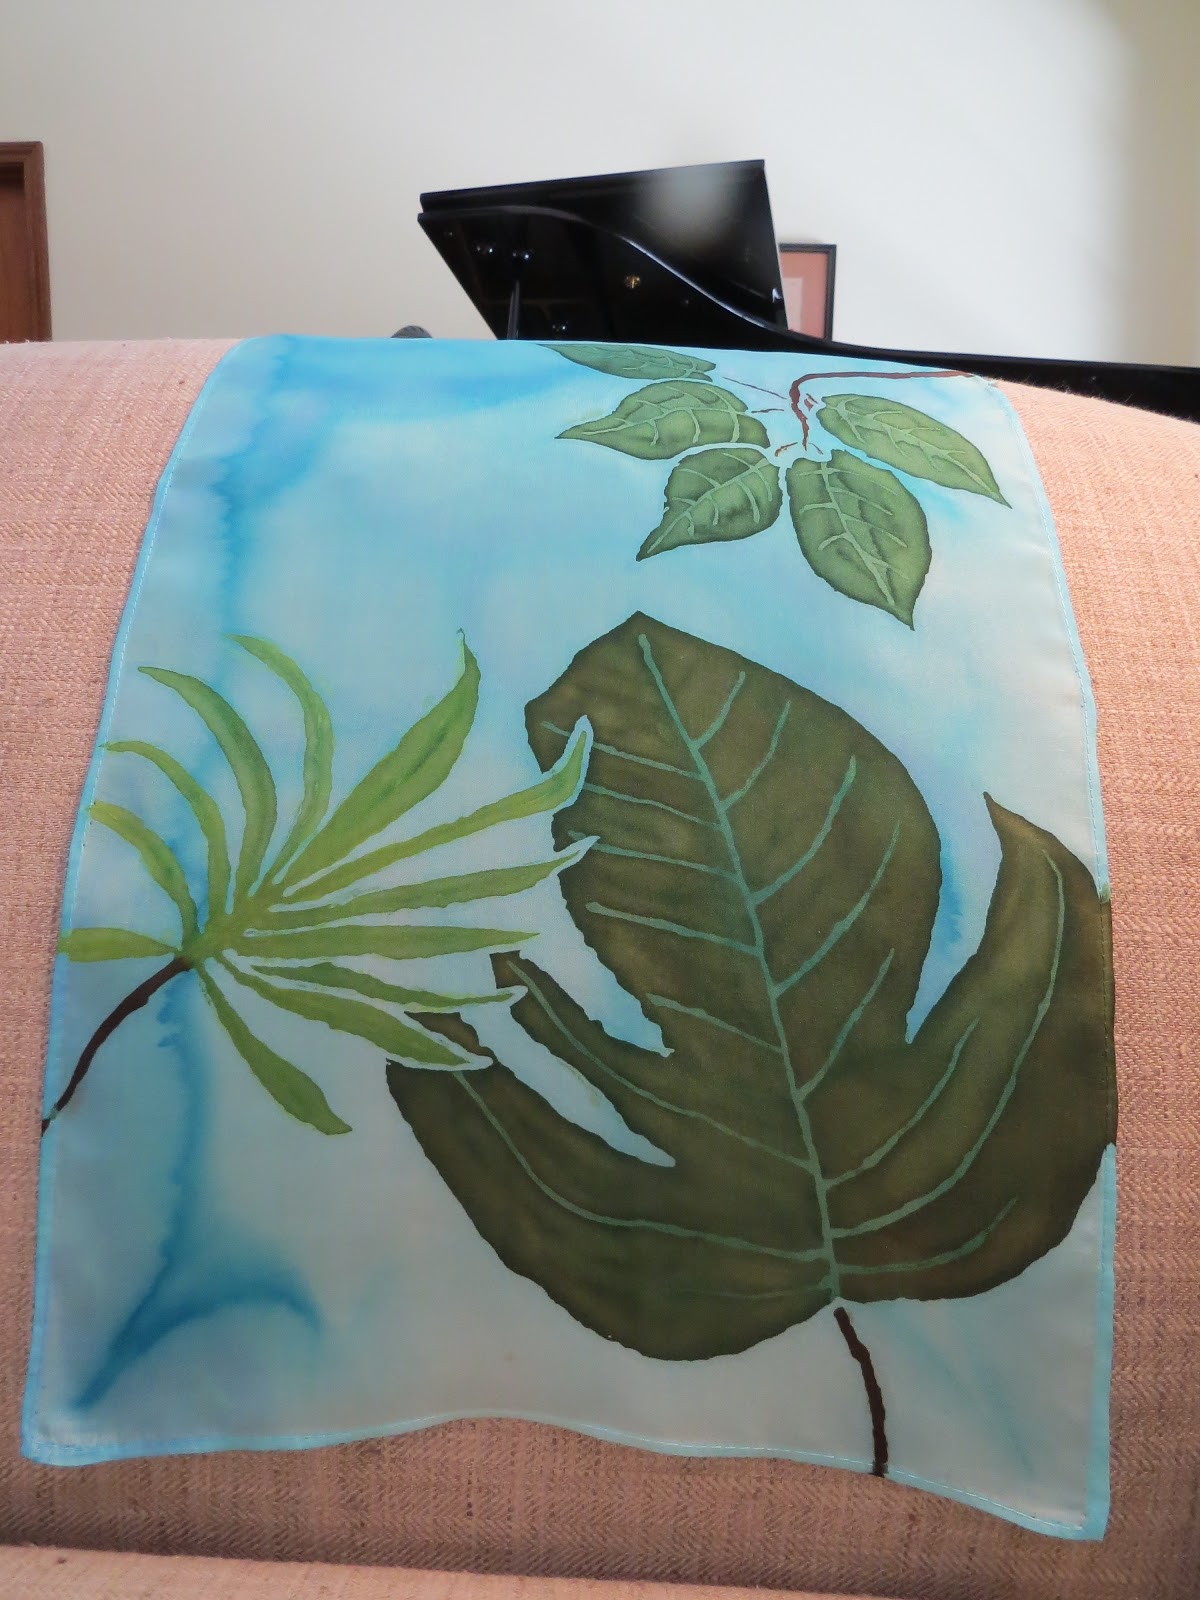 For my wonderful blog friend, fine artist, and creative woman with a super sense of fun, Jo Castillo, here are a couple photos of another scarf. Since I couldn't wait to post it, this tropical leaf design scarf appeared before the final processes were completed. Jo Castillo commented that she would like to see how it looked once the gutta resist outlines were soaked out. It is shown below, although the colors are a bit stronger than in these photos; they show up better in the older post. Thank you, readers, for your continued comments and interesting reflections.
Question of the Day: What are your favorite wardrobe colors?
Monday, June 29, 2020
Orange, Red, and Gold Hand-Painted Silk Scarf Using a Shibori Technique
 If I had kept track of the time spent making this 60" x 11" scarf, you might be surprised. It was more complicated than you would guess. This is the first time I have made a scarf using the arashi shibori technique (arashi means "storm" in Japanese--maybe referring to the wavy patterns' resemblance to thin clouds). A library book called Shibori by Elfriede Moller was my guide, although I modified her technique some. Here are a few scarves I made with other kinds of shibori techniques.
Using a chunky foot-long piece of PVC pipe, I attached the 11" end of the blank white silk scarf near the top with masking tape. The two corners did not overlap; this allowed for just one layer of the scarf to wrap around the pipe. Then, with pale crochet cotton tied around the pipe and secured with tape (this can be done with thicker string or any thread as well), I wound the crochet thread around the scarf on the pipe many times in a random pattern. After a section was wound with thread, it was scrunched up and the next section wound--until the entire length of silk was tightly gathered on the pipe. The tape had to come off so that it did not block the dyes.
Tying off the end of the thread, I then wet the silk well so that it was soaked through but not dripping wet. This helps the dye to spread, to blend, and to penetrate the folds. Then, with a dropper and sometimes a brush, I pushed a few colors of French silk dyes into the fabric. The technique allows for many variations; the internet has a number of examples if you'd like to see more. My goal was to color the entire scarf, but other artists leave white areas. The silk can also be folded and then wound onto the pipe. Depending on the pattern of the folding, the wavy stripes can run in more than one direction when the piece is completed (here is one example).
Once the piece is dry (24 hours or more), you can snip the string or thread and enjoy the big reveal. I used four dye colors, but found that one dominated the resulting scarf. The colors are called grenat (a brownish red), ruby, orange (a blend I made of coral and a bit of yellow), and a sort of gold (a blend of yellow and a bit of rich sienna). As you can see, the coral blend took over many areas--not really surprising since it has proven to be quite strong other times I've used it. Yet, the result did surprise me. So this project was a learning experience and an adventure that will help guide the next time I use the arashi shibori technique.
Question of the day: Do you enjoy experimenting with crafts or other projects--even when you don't know how they will turn out?
 |
| Close-up detail |
 |
| Close-up of the other side |
Once the piece is dry (24 hours or more), you can snip the string or thread and enjoy the big reveal. I used four dye colors, but found that one dominated the resulting scarf. The colors are called grenat (a brownish red), ruby, orange (a blend I made of coral and a bit of yellow), and a sort of gold (a blend of yellow and a bit of rich sienna). As you can see, the coral blend took over many areas--not really surprising since it has proven to be quite strong other times I've used it. Yet, the result did surprise me. So this project was a learning experience and an adventure that will help guide the next time I use the arashi shibori technique.
Question of the day: Do you enjoy experimenting with crafts or other projects--even when you don't know how they will turn out?
Tuesday, May 12, 2020
Westward Ho! Yellowstone's Mammoth Hot Springs and Terraces
 A cabin at Mammoth Hot Springs was our second "home" in Yellowstone National Park. The cabins (and newly refurbished hotel) are part of a hub toward the northwest corner of this huge park. The hot springs and extensive natural travertine terraces formed from dissolved limestone are fascinating. Over a mile of boardwalks allow visitors to explore them safely. Our day for exploring them and other nearby thermal features was chilly, grey and sometimes forbidding looking, so my photos show a completely different reality from the gleaming, pearly look of the terraces in bright weather. Of course, you can click on any photo to enlarge it.


 The Mammoth region is home to some of the largest herds of elk in the park as well as a variety of other wildlife. We had seen a few female elk in meadows in other parts of the park, but we were not expecting the number of elk we could watch in Mammoth. Nor were we prepared for the degree to which we saw some of them "up close and personal". We had been as careful as possible to stay the recommended distance away from wildlife, but in our cluster of cabins, the elk came to within eight feet of us. Between six and eight does and yearlings regularly grazed on the green grass the cabins surrounded--guess it was sweeter than the sagebrush on the hills around us. A number of others settled in around the cabins--one large doe even blocking access to our rented vehicle for awhile one morning.
  Since we visited in elk rutting season, we could hear the bucks' eerie high-pitched bugling at night. Several bucks were gathering harems in the area--one group hanging out often in Mammoth Village (cluster of ranger station, camp store, hotel, restaurants, etc.). Cars stopped, and some people came much closer than was safe to get the perfect photo--a challenge for the rangers to manage.
I have been puzzling over how to adequately express our awe and fascination with the natural wonders of the Grand Tetons and Yellowstone. We are thankful to have had the opportunity to spend some time there. Since we were already near the Northern edge of the park, I had arranged for us to fly out of Bozeman, MT rather than drive all the way back to Jackson, WY. Oh my, we wished we had had a few more days in Bozeman as well. It's a hip, cultured college town surrounded by breathtaking mountains. After a quick lunch and stroll in town, we visited the amazing Museum of the Rockies, arriving just in time for a visiting production of Mongolian music and dance in dazzling costumes. The accompanying extensive exhibit featuring Ghengis Khan was eye-opening. I had not known that the fierce, brutal warrior became a progressive (for that time) leader. The museum's permanent exhibits include a stunning variety of local dinosaur finds and Native American art.
Our itinerary worked well for us. We appreciated our time in Jackson, WY, and thrilled to the Grand Tetons. We were glad we had reserved rooms in two different corners of Yellowstone's expanse so that we could visit varied areas and features in a leisurely way without driving greater distances. You can view previous posts about our trip here. I hope you have the same opportunity some day.
Question of the day: Can you sometimes recall particular travel moments and experiences as vividly as if they had happened that day?
Saturday, March 7, 2020
Westward Ho! Part III. Yellowstone Thermal Feature Guided Tour
 |
| Nope, this is Fountain Geyser, which erupts on an irregular schedule |
 |
| Fountain Geyser and its small twin in back |
 |
| We were lucky to catch their eruption |
 |
| Heart Spring |
 |
| Microbial mats make the colors on the ground |
 |
| The mineral rich waters feed the microbes |
The tour was amazing, completely exceeding our expectations. Our guide shared his passion for Yellowstone's unique bubbling mud pots, geysers, hot springs, and steam vents, providing a wealth of fascinating information about the geology of the area. Driving our group in a restored 1938 yellow White Motor Co. bus, he answered a range of questions, provided bird and wildflower charts for those interested, and entertained us with stories of events from the amusing to the tragic that had occurred in this dangerous terrain.
 |
| The walls of the rapids came from lava flows |
 |
| Falls in Firehole Canyon |
 |
| Our funky bus, with hubby in the foreground |
Wednesday, January 22, 2020
Two 4" x 5" Flower Paintings

Clearly, landscapes come more easily to me, but the learning involved in these studies was worth it. Flowers come out better, I think, when they are not over-worked--with just a few brush strokes in just the right colors. Highlights add depth, but multiple layers of acrylic paint do not necessarily add anything, rather seemed to detract. I'm sure there are countless gorgeous flower paintings by accomplished floral artists that would prove me wrong. So maybe what I should say is that in a small piece, what would work better at least for me would be surer quicker strokes than I used on the hibiscus. They say live and learn, but I often need to try something new, make various mistakes, and learn. Since no one is grading the efforts, it's fun and refreshing.
The individual flowers that make up the astilbe plumes are too tiny to overwork, so that piece pleases me more. There is some layering, beginning with a slightly bluish white, finishing with slightly yellowed white (for the warmth) toward the tops of the plumes and some pure white highlights. I used a fan brush, pressed into the paint so that the bristles were nicely separated and dabbed away in a "plumey" pattern. For each piece, I had looked at photos in my husband's gardening and botanical reference books. We had a hibiscus in the back yard at the time I started that painting, so could use my own photos as well (the hibiscus was not blooming at the time, but I had studied them up close often enough to draw on memory too).
Question of the day: What new thing have you tried lately and what did you learn doing it?
Sunday, December 29, 2019
Egg, Ham, and Red Pepper Brunch Casserole--Our Christmas Eve Day Family Celebration
After searching in vain for an egg casserole recipe for our Christmas Eve Day brunch (I had certain flavors in mind), I decided to create my own. I relied on existing recipes for egg/milk proportions and included the ingredients that sounded good and that our family would like (I hoped--and they did!). Of course, you will vary the recipe below in any way that suits you and your family or guests. Our younger son would have liked it hotter; since he is alone in that, he'll need to use hot sauce on top. But you may want to use more cayenne pepper or to include chopped hot peppers. I think this casserole could take almost any cheese you like; this time we used Swiss cheese.

 The bacon left me wondering why I had waited so long to make it in the oven--fear of messy splatters, for one thing. It did not spatter at all, but baked up uniform and flat. My husband was kind enough to get the pans ready while I was doing other things. He placed the bacon strips on racks that were set in parchment paper-lined, rimmed baking sheets. It took 2 10" x 14" pans to bake a little over a pound of quality bacon (it's best if the strips don't overlap). The only caution is that it would be easy to burn it--it goes fast in the last couple of minutes. About 20 minutes at 400 degrees was perfect.

I wish I had taken a photo of the whole brunch, but didn't. We also had Martha Stewart's buttermilk French toast, a rich tasting and yummy version with pancake syrup and blueberry syrup, bacon I made in the oven, and the fruit salad you see pictured (there were egg casserole and fruit leftovers available for their photo shoot another day). We did not have green salad for brunch; the photo shows my plate of leftover casserole for supper another day. I have been searching for the French toast recipe on-line and can't find it--sorry. I had hoped to provide you with a link. I probably have the title wrong on my recipe card, but it was definitely a Martha recipe, modified a little.
 The bacon left me wondering why I had waited so long to make it in the oven--fear of messy splatters, for one thing. It did not spatter at all, but baked up uniform and flat. My husband was kind enough to get the pans ready while I was doing other things. He placed the bacon strips on racks that were set in parchment paper-lined, rimmed baking sheets. It took 2 10" x 14" pans to bake a little over a pound of quality bacon (it's best if the strips don't overlap). The only caution is that it would be easy to burn it--it goes fast in the last couple of minutes. About 20 minutes at 400 degrees was perfect.
The fruit salad was fresh pineapple, strawberries, raspberries, blueberries, and some fresh pomegranate seeds (which come all prepared in a plastic container from Pom Pom--saves lots of trouble wrestling with the whole fruit to get the seeds out). It was a delicious combination and looked festive in a cut glass bowl.
OK, the casserole recipe, made the day before serving:
Ham and Swiss Overnight Egg Casserole
1/2 cup chopped sweet onion
3/4 cup chopped red pepper
2 cups cubed deli black forest ham from a thick slice
1 4 oz. can chopped green chilies
8 eggs
2 cups skimmed evaporated milk
3/4 tsp. dry mustard
1/4 tsp. black pepper
generous dash cayenne pepper
2 cups shredded cheese (delicious with Swiss)
3 cups crusty bread (Cuban bread is yummy in this) torn or cut into about 1/2 inch pieces
Saute onion and red pepper in about 2 tsp. butter; add ham and green chilies and saute 1 more minute. Let cool a little while making the egg mixture.
Whisk eggs and skimmed evaporated milk together well; whisk in seasonings. Stir in about 1 1/2 cups of the cheese, the bread, and the ham mixture and mix well.
Pour into a 9" x 13" buttered or sprayed casserole dish. Top with remaining cheese. Cover well with foil and refrigerate overnight.
In the morning, leave the foil on and bake at 350 degrees for 30 minutes. Uncover and bake about 15 minutes more until it is set (it will firm up a little more as it stands).
A word about the skimmed evaporated milk: I have found it to be an excellent substitute for whole milk or even cream in many recipes. It lends richness and flavor to your dish with many fewer calories and less saturated fat.
I have posted other recipes; you will find a listing at the recipe index post.
I have posted other recipes; you will find a listing at the recipe index post.
Question of the Day: This is a new tradition for us; the family has traditionally joined us for an appetizer supper on Christmas Eve Day. However, this year we needed a schedule that left time for our 2 1/2 year old granddaughter to have a nap before they attended the Children's Christmas Eve service. How have your family's holiday traditions changed over the years--or do some things stay the same for you?
Sunday, November 24, 2019
Blue, Green, and Aqua Impressionistic Hand-painted Silk Scarf
 This impressionistic blue blend scarf is a new favorite--in fact, one I plan to keep for myself. It is especially pleasing that it is a rescue of a scarf that went wrong (see earlier post about that mistake). The white and misty aqua background that was left after I removed the messed-up gutta seemed perfect to re-do in a scarf with a blue, green, and aqua swirling print.
 |
| Close-up of one end |
 |
| Close-up of other end |
After choosing the palette and blending the colors I had tested and wanted to use, I wet the entire scarf well. Then, with a soft brush, I swirled the colors on in a sort of "planned random" way with a bit of unpainted area between many of the swirls so that the hues would flow together without too much mixing. I didn't want the colors to muddy each other or to blend too much. Once that looked satisfactory, I deepened some blue areas and quickly sprinkled kosher salt over while the areas were still quite wet. Using salt on wet French silk dyes works a kind of magic as the scarf dries, producing jagged lines, star burst effects, and concentrated darker spots. Sometimes, I do further modification of the colors or pattern after I see how the scarf looks dry. It would have been a mistake to tamper with these results; in my opinion, it is lovely just as it is. Now it's getting hard to wait to wear it; five newly hand-painted silk scarves are ready to be steam-set. One more, and I can load up the steamer and complete the finishing processes.
 |
| Close-up of center |
Question of the Day: Do you prefer defined patterns on silk, such as tulips or starfish, or a more abstract or impressionistic look?
Wednesday, October 30, 2019
Westward Ho! Part II. Exploring the Southern Half of Yellowstone National Park
 |
| Anticipating sunrise over Yellowstone Lake |
 |
| A doe elk spotted in a meadow at a scenic turnout |
 |
| One gathering of bison, part of a larger herd in Lamar Valley |
The next morning, we drove north on the loop and then east to the Lamar Valley and beyond--almost to the eastern edge of the park. The broad valley lived up to its reputation as the best location for watching large herds of bison and spotting other large mammals. We did not stop where a cluster of cars surrounded a bison on the shoulder; some people were much too close to the powerful animal. Further on, the valley gave way to towering peaks and rugged cliffs. Here, some kind Yellowstone enthusiasts invited us to look through their high-powered scopes at snowy white mountain goats, one almost skipping along where the rock face had only the narrowest possible ledges for its hooves. My husband also saw some pronghorns bounding from the grasslands into the trees, but they went by too fast on the wrong side of the road for me to see.
 |
| The smell of sulphur and steam rising reveal a thermal feature |
 |
| Boiling mud at Dragon's Mouth Spring |
I joined my early-bird husband for a walk before sunrise the next morning to watch the color change in the sky over Yellowstone Lake-- a gorgeous display, followed by a stunning sunrise. Then, a breakfast buffet at the Lake Restaurant overlooking the water before checking out on our way to our cabin on the north loop. Although we were not yet in the area with the most thermal features, we stopped at turnouts and parking areas to walk on the boardwalks over bubbling hot mud pits, hot springs, and steam vents called fumaroles. Dragon's Mouth Spring, pictured here, hissed and made thumping and crashing sounds as steam puffed out and mud at the entrance bubbled. It was easy to imagine a dragon inside that lair.
 |
| Lower Falls in the Grand Canyon of Yellowstone |
Question of the Day: Have you been to Yellowstone National Park? If yes, what did you particularly enjoy there, or if no, what would you like to see?
Monday, September 30, 2019
Westward Ho, Part I. Journey to the Grand Teton National Park
 |
| Along the Snake River, Grand Tetons in view |

Traveling from flat, hot coastal North Florida to cool, dry mountains was a treat. We love our home, but a change of scenery and climate at the end of the summer was (immensely) refreshing. It is difficult to find words to describe these breath-taking national treasures, as you know if you have visited there. And photos cannot begin to convey the magnificence of the mountains, valleys, meadows, and animals we saw. However, I'll try to share some of what we experienced.

We landed before noon in Jackson, WY on a chilly, rainy day, tired from getting up at 3 AM (1 AM mountain time!) for our flight. I had booked a room north of busy Jackson, but we first headed into town for lunch and exploration. Extra-large crowds of people clogged the streets, partly because we happened on a major--and delightful--art fair, and partly because it was too nasty a day for most hikers and outdoor explorers, so they came to town.
 Foggy, but gradually clearing weather cheered us in the morning, and we drove north on US 89 into the Grand Teton National Park. Low clouds hugged some of the highest peaks, while others stood proud in their jagged glory. For our first day, we drove north as far as Moran Junction, then west to the sparkling, bright blue Jackson Lake (I'll post photos of Jackson Lake in Part II), and south again along the lakeside, past Jenny Lake, and on back toward our Jackson room for one more night. We stopped whenever we wanted to at one of the many overlooks and just drank in the crisp, fresh air and awe-inspiring views.
 Finally, we stopped at a trail head to do some hiking. Our Lonely Planet guide included the distance for each trail, and sometimes the elevation change. The trail we chose was fairly challenging, and we found exertion at that altitude exhilarating, but tiring. I loved using my Pacer Poles for walking--very helpful for my back problems--and was able to walk further than I would have without them. The trail wound through meadows, forest, along and over a rocky, bubbling stream, past a park horse and mule corral, and up some steep rises. It was all too lovely for words. The first full day of our adventure was simply amazing. Stay tuned for more.
Question of the Day: What journeys have taken you to a very different place from home?
Subscribe to:
Posts (Atom)