Recently, a silk scarf I was working on took a bad turn. All artists (I imagine) experience this on occasion with a project. Sometimes, there is a way to fix the situation and move on; sometimes it cannot be saved. In this case, I could not fix the mistake, but was able to make the not-quite-ruined scarf reusable.
 |
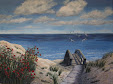
| First stage--the background |
 |
| Background from the other end |
The two photos of a scarf on a stretcher show the intended background for the piece. Painting wet-on-wet on a blank white scarf, I had made a shadowed pale aqua and blue ground on which I planned to paint large tropical leaves in various green hues. My original patterns--see photo of the design for one end of the scarf--were already sketched on heavy paper. The next step was to "draw" the design outlines on the scarf with gutta, a rubber-based resist. That's when it went wrong.
 |
| Design outline for one end of the scarf |
 |
| The gutta and applicator |
The gutta is applied with a small squeeze bottle through a metal tip with a small opening (see photo). The metal tips come in various sizes, and I think my mistake was using one with a medium opening at the top (it's still really tiny). The gutta flowed too fast and puddled, covering areas I intended to leave open. Every area covered with gutta would resist the French silk dyes and remain the background color. Using the metal tip with the smallest opening would have produced a thinner line of gutta and may have prevented the mess I ended up with. In some designs, this would not have mattered much; the design simply would have looked a bit different from what I'd intended. In this case, the leafy fronds on the left would have had undesirable aqua patches.
 |
| The gutta outlines, with messy overflow |
Even when the gutta is still wet, it cannot be wiped off, so I let the piece dry. What to do? I decided to start over and used the same dye blends in the same concentration as in the first scarf (glad I keep notes on my colors). Making no effort to duplicate the original background, I painted on the pale aqua and swirled in some blue. If all goes well this time, I hope to post the new, corrected version in the future.
 |
| Close-up of the messiest area |
Once all dye has been painted on, the finishing steps for a scarf (when using French silk dyes) are: steam setting the piece for an hour or more (I do several at once), soaking any scarves with gutta in naphtha to remove the resist (dry cleaning also works), then washing and pressing the scarves.
As an experiment, I soaked the original scarf in naphtha even though the dyes were not set. What's the worst that can happen?, I thought--the color will wash out or drastically fade, but the scarf might be reusable for another project. To my surprise, the color faded much less than expected. Now, I have two versions of an aqua/blue medley background to work with. Stay tuned.
Question of the day: Along with success stories, isn't it sometimes helpful to hear about a day that things went wrong for someone else?


Wow, Mary. I never thought about how you do the silk scarves. Amazing. More work than I am capable of .. lazy me. Thanks for the story and info.
ReplyDeleteOMG! What an interesting blog. That is a lot of work. The pictures look pretty ammazing how they are. I think anyone who does any type of craft can have have a day where something went wrong. Somehow we always manage to find a way to fix "the new opportunity". Have a great week!
ReplyDeleteOh my goodness, Jo, you do not strike me as lazy at all. Your discipline in the frequency of your sketching and other art projects puts me to shame. I appreciate your response because I take the various stages of the silk painting process for granted (although I don't enjoy every necessary step :>). Thanks for letting me see it through your eyes.
ReplyDeleteI like your positive outlook, Nanny! Thanks for stopping in and for taking time for a great comment.
ReplyDeleteLovely silk painting demonstration ~ beautiful work ~ ^_^
ReplyDeleteHappy Days to you,
A ShutterBug Explores,
aka (A Creative Harbor)
ps. hope you get to paint a shadows painting
Thank you for stopping in, Carol. It has been awhile since I have featured shadows in a painting and have been thinking about doing a few sometime. Your lovely photo of shadows is great inspiration.
ReplyDeletepainting looks beautiful...
ReplyDeletehave a great day
Thank you very much, Tanza. Good to hear from you again.
ReplyDelete