Tuesday, September 30, 2014

Creations by Various Folk School Students, Quilts, Scarves, Wooden Trunks, and More--All Hand Crafted

     When we took a week of classes at the John C. Campbell Folk School in North Carolina, Mark in clay pots thrown on a pottery wheel, me in hand-painting silk scarves, we joined dozens of others in about 12 different classes. At the end of our time there, we all gathered for a show of the many creations produced by students during the week. The entertainment at the gathering included country and folk classics played by a string group from the fiddling class that also met all that week. 

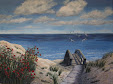
     Seeing the results of the excellent teaching and focused student efforts was amazing and inspirational. A commenter on this blog to one of my previous silk painting posts (thank you, Rosemary) suggested that I must have been Donna Kassab's "star pupil". Not so! (although I appreciate the compliment) All the students' scarves were lovely. One of the delights of working in a small class with other creative people is observing their varied approaches to using the medium. The first three photos show the hand-painted silk scarves exhibited by our class members at that end-of-the-week show. Sadly, two women had to leave early, and their gorgeous scarves were not available for the show. Still, I think you will get a sense of the differing original designs, the use of color in varied ways--and, hopefully, get a taste of how stimulating it is to learn and create with others at this excellent "art camp for adults".

     The group that made wooden trunks had begun the weekend before, choosing the type of lumber each would use and beginning the rough assembly. Then, they alternated between the wood shop and the blacksmith shop completing the trunks and applying layer after layer of finish as well as hand-forging the hinges and clasps. You see one trunk made by the husband of a silk painter--he used red oak, and she painted a red oak themed scarf to display with it. 

     For the rest, you see lovely quilts displayed behind the trunks (each made in one week!), wood turning products, hand-made glass beads, and the gathering for our final ceremonies and celebration. Click on any photo to see it larger. Thank you for viewing this post; I have loved reliving a super time. For earlier posts about our silk painting class click here.


Question of the day: What sort of class would you take, given the chance?

Wednesday, September 17, 2014

Small North Florida Waterscape Painting--Matanzas River Scene

     This small painting of a view across the Matanzas River from a public beach near St. Augustine, Florida, is not quite finished. However, I decided to show you the present (nearly completed) version today. Life has been full lately, and it's hard to say just when there will be time to make the remaining adjustments I have in mind.

     The acrylic on gallery-wrapped canvas piece is 12" wide and just 6" tall, in a kind of panoramic format. One of my reference photos appears in a post from more than two years ago when my husband and I enjoyed an outing to this area and nearby Crescent Beach. You can see photos from that day and read an account of it here. The Matanzas River is tidal, flowing into the Atlantic Ocean near this beach through the Matanzas Inlet (out of sight to your left as you view the scene).
     
     When ready, the painting will be a gift for a friend who once lived on a boat in this area. I wanted to get her perspective on how well I have captured the feel of the sand, water, vegetation, etc., so showed it to her recently. It was gratifying to get her stamp of approval on my interpretation of this lovely spot. She mentioned the distinctive, slightly pinkish sand and other aspects of the scene she knows so well and felt that this little painting captured the right tones and feel. That was a good feeling, especially since it is for her :>) .

     At first, this piece was intended as both a stand-alone work and a possible preliminary study for a larger painting, but for now, I'm happy with this version and do not expect to paint another. It's time to move on (whenever I manage to reserve painting time again) and to begin a different coastal North Florida landscape.

Question of the day: When you see--or create--a painting of a familiar scene, do you prefer to see it fairly realistically portrayed, or do you enjoy visual interpretations that "bend" what's there for an artistic purpose?

Thursday, August 21, 2014

More Hand-Painted Silk Scarves

     I made the first two hand-painted, one-of-a-kind silk scarves shown in this post at the week-long "art camp for grown-ups" class I mentioned in a previous post. The Asian-influenced design in apricot and sage green was a learning experience on several levels. One of my first attempts to draw a design using resist to prevent the dyes from running together, it also was a hopeful stab at mixing colors to match outfits without having them in the room with me for comparison. Both the main colors are some favorites in my wardrobe, and I was thrilled when the results looked perfect with all the outfits I had in mind.

     The nighttime scene with moon and owl also arose from a desire to practice using resist to "draw" on white silk, then to paint inside those lines, and finally to fill in a freer style background. Two techniques produce the sky in the scene: some of the areas allow the colors to run together on their own, which produces uneven--sometimes jagged--lines while other areas used a quick rubbing technique Donna Kassab taught in the class to achieve blended tones (click on this, or any, photo to see more detail). The "stars" are simply dots of resist on the white silk before painting.

     The fuchsia and orange scarf began as a disaster. In the class, the result of painting the background waves of color was (in my view) garish. Believe it or not, the colors are considerably toned down now. Although some classmates liked the original, I decided to remove some of the dye right away and washed out the color 3 or 4 times. After the scarf dried, I took it home, uncertain how to finish it. Once I had all my equipment and supplies collected at home, I decided to use resist to draw sort of day lily type flowers in the corners and painted them with coordinating colors. I also restored some of the orange tones in the background. Sorry I don't have a better photo; I gave a couple of scarves away to relatives on a recent vacation, and this one was snapped up before it had posed properly. You see it here on the stretcher frame my long-suffering husband helped me make. The silks must be suspended and stretched for the painting and drying processes.


     Finally, the green/purple/yellow scarf, another version of my "Colorburst" design, is one of two I made for a friend who wanted to purchase a green toned scarf for a gift. She wanted some greens in the Colorburst design, but was somewhat vague on details, so I made two for her to consider. I don't have a good photo of the one she chose, but this is the other--the first scarf made entirely on my own at home. What fun all these projects have been!

Question of the day: Can you tell that my love of color is a key factor in my enjoyment of both silk and landscape painting? How does color bring joy in your life?

Thursday, July 31, 2014

Beautiful Gibbs Gardens in North Georgia

     When we were in Georgia recently to visit family and friends, we toured Gibbs Gardens. Our time there was renewing and inspiring, with truly gorgeous landscaped and planted areas as well as extensive natural hillsides, streams, and meadows. The day lily gardens were featured at the time we were there; visits at other times of the year feature whatever flowers are naturally in full bloom in that mini-season.


     I won't try to describe the many features or history of this delightful attraction. If you are interested, their web site is lovely and informative. The gardens are located less than an hour north of Atlanta, GA, in the triangle formed by GA 400, I-285, and I-575 (off I-75). We would highly recommend you see it for yourselves sometime--if you live anywhere near the area or if you travel through Atlanta in the future.


     I have been enjoying my creative everyday life in recent months, and apologize for not posting for quite awhile. Beginning now, I plan to resume blogging more regularly again--as well as making more faithful visits to the postings of blogging friends.

Question of the day: What flowers or flowering plants do you most enjoy?


Monday, April 7, 2014

Painting Silk Scarves Without Using a Resist Agent

     The two silk scarves pictured today are among several I made at "art camp". These two have been especially usable and fun to wear; they each coordinate with many outfits and brighten neutral-toned tops. Changing the corner that shows or tying the scarf in different ways features various colors according to whatever section of the scarf best complements an outfit.


     I did not use any resist agent to control the flow of dye in these two pieces. In other words, the dye was brushed straight onto the unpainted silk scarf and allowed to diffuse and spread naturally. Each stroke blends with other dye colors that have been brushed near them, often creating unplanned effects and varied edges (some jagged-looking, some smoother). These effects are delightful to watch and are both fun and challenging to work with in silk painting design. The rest of the post describes the painting process--including the use of salt and alcohol for special effects--for interested readers.

     The multi-colored scarf with yellows, oranges, and reds predominating evolved from my original plan to a somewhat different design. After blending each of the dye colors I wanted to use (in small cups), I began to brush the gorgeous colors in strips from the edge of the scarf toward the center. As you can see in the photo below, I did not bring the colors all the way to the center at first. To deepen the colors, I painted over some areas again once they were dry--sometimes with the same color, sometimes blending in another color. Then, as the final version of the strips of color dried, classmates began to comment on the design, calling it "like fire" or "fireworks". So, I went with that, rather than with the autumn theme in my mind (don't ask--it would be boring to try to explain). I completed the center with a burst of "fire", taking advantage of an interesting property of yellow dye. As our teacher, Donna Kassab, had shown us, yellow dye (who knows why) tends to "push" other colors back a bit in the silk. The yellow and yellow-orange blend in the center performed their magic and created an interesting jagged edge in the process. A bit of salt created some variation in the center (see next paragraph for more on using salt). Fun stuff!


     The green and blue scarf went even more quickly. I brushed the entire scarf with slightly varied green tones as a background. Once that was dry, I began in the center with ultramarine blue and brushed a large spiral shape (leaving a fair amount of open space). Then, I brushed shades of turquoise next to the blue, again leaving some space for the background green to show. Finally, for the "special effects"  of spots and mottling you see, I sprinkled the wet surface with table salt and some chunky sea salt here and there for variety. Lightly spraying alcohol from a couple of different angles completed the piece. Both the salt and alcohol continue to work until the silk is completely dry, either drawing the dye in (salt) or repelling it (alcohol drops). So again, the process took on a life of its own, partly unexpected, although--since I had some experience with the materials by that time--partly as I had hoped and expected.

Question of the day: Do you prefer creative processes over which you (at least mostly) exert some control, or do you enjoy using media which to some degree, drive the creation in unexpected directions?     

Saturday, March 22, 2014

Silk Painting Classes--a Heavenly Week

     Earlier this month, I took a whole week of silk painting instruction with Donna Kassab at the John C. Campbell Folk School near Murphy, North Carolina (yes, Rosemary guessed the location in her response to the previous post). It was glorious! Given my love of fabrics and color, silk painting is an art form that has intrigued me for some time. So it was a thrill to have an excellent instructor for a week of classes at this top-notch "art camp for grown-ups". Also a treat: my long-suffering husband, Mark, consented to go along and took a beginners class in throwing pots on a pottery wheel.
     We painted on 22" square plain white silk scarves and learned several different techniques for manipulating the dyes and creating designs. The photos here show my husband's favorite scarf--the purple, blue, and turquoise impression of the ocean--and the first scarf I made in the class--bright red-orange hibiscus (or whatever flower they turned out to be) with a soft sea green background. In a wonderful way, the dyes diffuse into the silk, only partially under the painter's control. For some designs, we used a resist called gutta to outline areas, which prevents the dye from crossing the line of gutta. Both of these scarves employed gutta in their creation, though in somewhat different ways. Even with gutta, results can be a delightful surprise; other results, of course, are less delightful, but take the piece in new directions if the painter remains open and flexible. As Donna often reminded us, "There are no mistakes in silk painting--only design changes." 

     Among the 12 or 13 varied classes offered during our week at the Folk School (from blacksmithing to pottery to quilting to mountain-style fiddle playing), our silk painting teacher and my husband's pottery teacher were two of just three instructors who were chosen to give open demonstrations during free time. The group photo shows our teacher, Donna Kassab, explaining the process of painting a silk scarf. Her husband, Magdi (in the cap), who helped Donna and our class members every step of the way, and my husband (in the charcoal grey fleece) are among those watching the demonstration. Note the frame Magdi made, on which the silk scarf is stretched and elevated for the painting process; the above photos of my scarves were taken while the pieces were still on the frame to dry. Once the scarves are dry, the dyes must be permanently set by a steaming process (a separate, chemical process removes the gutta, when used). For Donna's demonstration, all of the silk painting students had hung the pieces we had made to that point around the room, as you can see in the photo of a bulletin board.


     In future posts, I will tell you more about the equipment, dyes, and processes we learned and show you more of the scarves we made. There is also much more to tell you about the John C. Campbell Folk School.

Question of the day:  Let's dream a little: If you had the time, resources, and energy to go anywhere for a creative or other learning adventure, what would you do?

Sunday, March 9, 2014

Where in the World Was Mary Lemmenes?

     We have been away for a couple of weeks, the second week spent at a lovely, creative place. Later this week, when I have time for a longer post, I'll tell you about the place and the experience. For now, I wanted to check in since it's been awhile and to show you a couple of photos. Some of you may know about this special place already.


     The last photo is a dead giveaway if you are familiar with the location and its purpose.

Thursday, February 20, 2014

Coastal North Florida Water View Painting, "Summer Reflections"

"Summer Reflections"
     "Summer Reflections" stands on our fireplace mantel for consideration over the next week or so. Will there be any more minor adjustments to the scene? That remains to be seen.

Today's photos show a newly painted piece of a creek scene near our neighborhood, a couple of detail close-ups, and one of the original reference photos. From the reference photo, you can see that I brightened the colors considerably (while trying not to go overboard with that) and cleared out a lot of North Florida's exuberant, messy-looking growth. As always, you can click on a photo to enlarge it.
A detail from the painting

     The painting is on a 2" deep 18" x 24" gallery wrap canvas with the scene continued onto all the sides so that it can be hung with or without a frame. The palette, in acrylic paints, includes ultramarine blue, phthalo blue, dioxazine purple, sap green, naphthol crimson, yellow ochre, Naples yellow, burnt sienna, Payne's grey, and titanium white. 

     For a change, I toned the canvas with a pale burnt sienna tone. Then, after painting the sky in roughly as you see it, I established a fairly dark under painting for the rest. In acrylic paintings, we often work from darks to lights because even light colors (especially when mixed with an opaque white) cover well. Next, the sky was modified and a few clouds added. The far trees were next in muted bluish tones, requiring several milky glazes to get the right hazy appearance of distance. I cut loose on the creek, laying in quick, slightly curved horizontal strokes in a variety of colors and blends. I meant that to be an under painting for the water, but much of it stayed because of the vibrant feel of movement the strokes provided. 
One of several reference photos for this piece

     Most areas of the painting required gradual buildup in layers as lighter and lighter tones were added to the darker under painting. I can't tell you how often during the process my husband asked if the painting would stay so dark, but finally, the gradual, subtle differentiation of tones and colors and layered highlighting led to the version you see today. I exaggerated the differing shades of the foliage; one of the most difficult tasks for a Florida landscape artist can be creating an interesting interpretation of tangled green, green, and more green. This one may be about finished; we'll see what several more days of living with it brings. 

Question of the day: Are you also drawn to scenes with natural water features?

Thursday, February 13, 2014

A Bonus for Our Sketching Class

     Our sketching class enjoyed the bonus of a guest teacher in our third session. The change in plans occurred because Charleston, SC artist Margaret (Maggie) Hoybach came to visit our regular teacher, Mary Ann Miller and offered to lead a class. Mary Ann generously invited us to her lovely home for the class, followed by a Provence-style lunch (yummy homemade quiche). You can see other images from that third class as well as our fourth and final class on Mary Ann's blog, too. (I was not able to be in her February class, so scroll down to find the two final January gatherings.)
     
     Maggie, in the red sweater, first showed us some of her gorgeous watercolor paintings and travel sketch/scrap books (which are amazing works of art in themselves). You can treat yourself to Maggie's website here. Then, she provided an interesting and very challenging exercise. Projecting various scenes for just a minute or so, she told us to outline a sketch in pencil and jot down a few notes so that we could further develop the drawing later. We imagined ourselves traveling, perhaps by bus, with limited time to capture an impression of each passing scene. Her method is to quickly place the major lines for the portion of the scene she has chosen to draw: the horizon, a path, building, large tree, or whatever. Then, we were to make a few notes of dominant colors and to indicate values with numbers in the margin (from lightest to darkest: 1 to 5). Since we were using pencil (unlike our other classes, where we sketched in pen), we could later adjust the composition and sketch in other remembered elements. She projected 7 or 8 images for us to outline; than we returned to our tables to revise and color (with watercolor paints) any images we wanted to develop further.


     This could be something fun to try in future travels, and was another helpful way for me to continue practicing drawing. I am still a beginner, but have improved over these helpful lessons. I'll try not to apologize for the efforts I am showing you today. As always, you can click on any photo to see it full size.


     The entire experience at Mary Ann's home (or, La Chambre Jaune Cafe, as she calls her sun room) was delightful. The setting, decorated in the characteristic blue and yellow of Provence in France; the delicious lunch; the shared expertise of our two accomplished artist/teachers; and the lively company of fellow sketchers (many of whom create masterful pictures, quite out of my league)--all of it added up to a day to remember.

     Since I don't plan a separate post on our fourth and final class, I'll throw in a small caricature style sketch from that session. Mary Ann encouraged us to try drawing people--not in any detail or as portraits--but simply to be able to indicate the presence of others in our work. So, I doodled a fellow student immersed in her sketching.

Question of the day: In what small way have you stretched yourself lately?


Thursday, January 30, 2014

Sketching Classes--Helpful and Humbling

Some of us at Mimi's (with our amazing server, Shaniqua). That's me, front right.
     I just completed the fourth in a series of sketching classes with children's book illustrator and travel sketchbook author, Mary Ann Miller. Mary Ann is a delightful, encouraging teacher who requires her students to sketch in (gasp!) pen. Even though I have been creating landscape paintings for several years, I know that my drawing skills are very limited and had planned to take a class sometime. I occasionally draw in grey tone pencil or colored pencils, often landscapes or individual elements, such as a particular tree. Small sketches are also invaluable in my planning for any painting to establish a good composition and an effective tonal balance (darks and lights). However, those sketches do not need much development; they are not meant to stand alone (one example, here).
Teacher extraordinaire, Mary Ann Miller, in the plaid.

     So, when I attended a fascinating book talk by Mary Ann Miller and saw her published travel sketchbooks (she travels often and fills a sketchbook on each trip), I knew I had found an excellent teacher. Mary Ann usually sketches with pen and water color; you can see her travel books here. The reason for her insistence that students use pen also is that pencil and eraser enable the student to draw with little forethought or planning (using a pen encourages thoughtfulness) and/or to become fussy trying to perfect a drawing with erasures and corrections. The fussy approach kills the spontaneity and liveliness of sketching. Given my limited skills, using a pen was intimidating. I had to remind myself that the learning process was what mattered and that any "failed" attempts only meant I had learned something, then turn the page and try again.

     We met on four Wednesday mornings from 10 - 12 (plus lunch together if we wished) in a different cafe each week and practiced sketching the objects and people around us. Students often sketched their breakfast, lunch, or beverage, but it is surprising how many other good practice subjects were right around us in each location. 

     These photos show the results of my work in our second class, at a Mimi's cafe nearby. Mary Ann travels with a small blue plastic vase so that she can keep a fresh flower or two in her room or even on her table at an outdoor cafe. The vase makes an appearance in many of her sketches, and several came to each class for our use. For Mary Ann's photos from these classes, see her blog (scroll down past the wonderful photos from a recent opening of their travel art group for the first two classes of our group). My first, small sketch from Mimi's followed Mary Ann's suggestion to include something that sets the piece in the place it was made--here, a Mimi's menu under a few objects. 


     The second, larger sketch shows some decorative pieces on a shelf at the cafe. You can see I took the liberty of moving the messy wine rack out and added another object from nearby in its place as well as "resizing" the urn for more variety. Given that I have never used water colors as an adult, I practiced at home after our session before adding some simple color to the first sketch. The second is still awaiting color, unless I decide to leave it as is. When I asked Mary Ann's advice about the matter this past session, her suggestion--pure genius, I think--was to make a copy of the sketch on art paper (which will fit in our copier) and to try out some color ideas on a copy or two. Will definitely do that.
Question of the day: Do you put yourself "out there" to try new activities and to attempt to learn new skills even if (like me) you hate the feeling of incompetence in the beginning stages of learning?

Friday, December 27, 2013

Merry Christmas from our Home to Yours

     OK, where did most of December go? It's time I posted a few holiday photos before they look completely out of place and time.

     We feel most fortunate this year to have had both our sons, their wonderful brides, and one grandson together in Jacksonville. Although 2013 has not been trouble free for us and our loved ones, we have a great deal to be thankful for. We celebrated Christmas with true gratitude to God for the gift of God-with-us. I hope this Christmas was meaningful for all readers who mark the Christmas season. For others, I wish you holiday season joy and peace and a wonderful, surprising (in a good 
way) New Year.

     As a cloudy afternoon sky darkens toward approaching sunset, I'll leave you with views of our front yard display. Nothing fancy, just simple symbols of the joy of Christmas and a wreath to welcome all inside.

Question of the day: What is one hope you hold for 2014--small and simple, or bold and large--personal or beyond?

Saturday, November 30, 2013

North Florida's Natural Beauty

     Recently, my friend Dee and I brought our cameras for some time exploring  my immediate neighborhood and a roadside creek view a couple miles up the road. We both appreciate the natural beauty in coastal North Florida and often share tips about places to see and photograph water birds, hawks, eagles, or other wildlife. Dee had borrowed a camera from a friend to see whether she would like that brand and that particular zoom lens for herself. I just used my usual humble camera, but we both captured some good shots. Now, I will consider which of my photos might make or be a part of a future painting.

     The egret haunts a retention pond just a few houses away from our home. The grey skies and soft winter light made for subtle scenes at the creek.


 Question of the day: Do you take time to look around you daily?