Thursday, December 29, 2016

Peace and Hope for 2017

Family Thanksgiving visit
Coastal North Florida sunset
     As we approach another year, I feel hopeful and pray for hope for all of you. We hear too much doom and gloom right now, in my opinion. Of course, some bad things will happen as the weeks go by; that's how life is. But I also see and hear about many kind acts by ordinary people, many good outcomes in difficult situations, and many brave Americans doing their best for their families, community, and nation.


     I have promised myself to look around me in wonder every day (yes, even on those days--can I keep my promise even then?) seeking beauty in nature, courage and kindness in people, and simple decency toward and respect for everyone I encounter. I pray for the same for all of you who have celebrated the love of God in Christmas or the steadfast care of God in Hanukkah--as well as for all well-intentioned people vowing to care for one another in 2017.

     From our home and family to all of you: may peace, joy, and hope come your way.
Super moon setting over the ocean
Our Christmas home

Friday, November 18, 2016

River Cruise from Arles to Lyon in Southern France

View of Vienne, France from Mont Pipet
     In early September, we enjoyed a Viking River Cruise in southern France, from Arles and Avignon north to Lyon. Warmer than normal weather accompanied us all the way, and interesting shore excursions with local guides alternated with either cruising along watching the lovely French countryside slip by or an overnight docked at a town or city with extra time for strolling.
A town square in Vienne


     On board the ship, Viking's excellent service, superior chef, and comfortable accommodation spoiled us royally. Since we are accustomed to budget travel, the luxury was a treat. I had saved for quite awhile to try a river cruise, and we loved it! One reason for its appeal was that we could glide from one place to another, see some highlights of Provence and the Beaujolais region and still curl up in the same comfy stateroom every night (much more convenient and relaxing than travel by car, bus tour, or train).  
In the lock, as seen from our stateroom's veranda
Approaching a lock


     Today, I'll show you various spots--not necessarily in order--and some of the interesting aspects of river cruising. For example, in the relatively short distance our eight day tour covered, we passed through 15 locks. The captain's expertise was amazing as we slipped through, sometimes with only a few inches clearance on each side.


Lyon


On the Rhone River in Lyon

A sunset in the countryside of Provence, seen from our veranda

Thursday, October 20, 2016

Hand-painted Purple, Yellow, and Green Silk Scarf with Clematis Flowers

     This hand-painted 11" x 60" silk scarf was inspired by the lovely flowers on clematis vines. Of the various varieties in our botanical reference books (oh, the gorgeous photos!), I decided to represent one with six-petal blossoms in shaded purple tones. My silk painting technique, using French-style dyes, does not allow for perfection in reproducing nature exactly; the results are more free-form or impressionistic. But these flowers look more like the photos than some (for example, I used a different approach for an earlier scarwith a loose painting technique; they are not meant to be like any "real" flowers).

     Rather than describe all the details of the process, I'll summarize and readers who want more can follow links to more extensive explanations. To avoid pure white gutta outlines, I painted the entire scarf with pale yellow and yellow-green, wet-on-wet, before any drawing and let the piece dry. Then, with preliminary sketches as a guide to shape and placement, I lightly drew in the flowers and leaves with a water-soluble fabric pencil and then traced the design with gutta resist.

Closer view of design details
     The flowers and leaves took several layers of dye to gradually deepen and vary the shades and tones. I used a permanent fabric marker for the vines and a few other small details.

     Painting on silk is always a discovery process, and I am still learning and growing in the art. This particular scarf turned out well, I think, and I am using a similar approach to create an autumn leaf design. Stay tuned.

Question of the day: For scarf wearers, what sorts of designs do you like best: flowers and other themes from nature, abstract, geometric, or other?


Thursday, September 29, 2016

Ocean-Inspired Aqua, Blue, and Purple Hand-painted Silk Scarf

An 11" x 60" one-of-a-kind, hand-painted silk scarf
     This ocean-inspired aqua, blue, and purple hand-painted silk scarf, 11" x 60", was a delight to paint. I used French-
style silk dyes and began with diluted blue and aqua to paint the large middle area in pale shades, blending well. Just as a clear sky shades slightly from a truer blue appearance overhead to a more aqua look nearer the horizon, I used blue in the very center and shaded to aqua further from center. 


     Of course, I was not trying to make a realistic ocean and sky picture, but hoped to suggest them. In the second stage, I used stronger (much less diluted) hues and began to work on the very ends. The mottled areas result from liberal doses of kosher salt--salt draws wet dye up to create random jagged patterns. What is the area meant to represent? you may ask. I had some thoughts, but mostly wanted some variety in the look of the ends of the scarf. People who have seen it each have their own ideas: currents deep down, the ocean bottom, coral, the movement of sea creatures. Take your pick; it's fun to imagine what shape and texture could represent.

Seen from another angle 

     Working up from the ends, I laid in wavy strips of various shades of blue, aqua, and purple, along with some deep rose. I had some of these shades premixed and ready; others resulted from the colors overlapping and mixing on their own or from adding subsequent tones over the first layer of color. 

     When I approached the "sky" area, I used gutta as a resist (more information here) to draw wiggly outlines for a suggestion of currents and waves (click on any photo to enlarge). Once the gutta had dried, I could continue to create undulating watery tones--using gradually lighted versions of the colors. Since French silk dyes are transparent up to seven layers of color, I could add and modify any of the hues until the result felt right.
The earlier silk scarf, made in my class

     When I originally learned the art of silk painting from Donna Kassab at the John C. Campbell Folk School (see posts about the class here), one of my first silk scarf creations (and still a favorite) was a 22" square ocean-inspired piece. That design sparked the long scarf shown in this post. The square piece looks odd in the photo because it had just come off the stretcher on which we paint on silks (it doesn't actually have a scalloped hem). My favorite aspects of French-style silk painting are the intense colors and the element of unpredictability in the process. Every creation feels like a discovery.

Question of the day: What colors and color combinations are your favorites?

Wednesday, August 31, 2016

Hand-painted Rose, Purple, and Blue Silk Scarf

     I have almost completed 3 more hand-painted silk scarves, all 60" X 11", a nice all-purpose length to tie and wear in multiple ways. This particular scarf was painted without resist, so the dyes were free to flow. I will show you the other new scarves, which did involve using resist to create designs, in coming weeks. For a couple of other examples painted without resist, see this previous post.

Another view, same scarf
     Sometimes, I purposely allow for the unpredictable jagged edges that can form where two different colors come together (especially if one is already dry), which often create beautiful, sometimes unexpected patterns. You can see such edges in the apricot/green 21" square scarf pictured below. 

Professional fabric steamer, about 42" long
     However, I decided to minimize those kinds of edges in this design. One can achieve subtler, smoother color transitions by working very quickly and rubbing adjoining areas with a paper towel. Or, as in this design, one can work wet-on-wet, spraying the white scarf with water before adding colors. For this scarf, I painted the dyes on a wet scarf blank. I experimented with colors and techniques, intending to gradually build up colors to a darker level. Then, the softer, pale colors appealed to me, especially after my friend agreed, saying "It looks like Spring". So, I decided to declare the scarf complete. 

Example of the jagged edges resulting from painting on dry scarf with no blending
     The final step is to steam-set the colors. Many fabric dyes can be set with a steam iron, and some set instantly when painted onto fabrics. But the loveliest and most intense colors, in my view, result from the French-type silk dyes, which must be set in a steamer--either purchased or created by the artist. My generous husband gave me a professional fabric steamer for Christmas--see photo--which greatly simplifies the process (although it is still painstaking and requires several hours altogether). If any of you request more information about the steaming process, I will post more detail in the future.

     Making this scarf was fun. I had only a simple sketch with the idea of color areas and a plan for the dye colors I would use (some straight from the bottle, others mixed for the desired hue). From there, I just spread color freely on the wet silk and watched the design develop--now and then blending the areas where colors came together with a large wet brush or a paper towel. Finally, I brushed on some additional soft contrast strokes and shapes.

Question of the day: In pursuing a hobby or interest, do you prefer trying new techniques and styles or polishing and perfecting your favorite approach?

Friday, July 29, 2016

A Wonderful Plein Air Painting Workshop

Kathie and Mary Jane respond to a student's questions
The Windmill Gallery's porch provides shade for one student.
     Taking painting classes and workshops always inspires and motivates me as well as improving my skills and range. In May of 2015, I set myself a particularly tough challenge by participating in a two-day plein air workshop in the north-central Florida countryside near Gainesville. We set up outside a former art gallery, the Windmill Gallery, on a highway near the Paynes Prairie preserve on a rise overlooking Orange Lake--a uniquely long view given our mostly flat Florida terrain.

Kathie Wobie, Mary Jane Volkmann (left to right)


     Two excellent painters led the workshop and proved to be super teachers, Mary Jane Volkmann and Kathie (Kathleen) Wobie. Somehow, events last year caused me to forget that I had never told you about this experience, so I'll hit some of the highlights now. The sketchy nature of the few notes I have from those two days remind me of the quick (yet manageable) pace Kathie and Mary Jane set, with a wealth of helpful exercises for us--usually preceded by brief demos or specific, targeted information fitting the purpose of each. Called "Color and Dimension", the plein air workshop helped us explore light, color, and perspective to give our landscape paintings a sense of immediacy and distance. 
Overlooking Orange Lake in the distance
A view from one shady (but bee-filled) spot I used

     We were encouraged to use a limited palette with two blues, two reds, and two yellows (a cool and warm hue of each), white, and black. Students, who had a range of skill levels, could use either oil or acrylic paints. As an acrylic painter, coping with the paint's fast drying time outside was difficult. Beyond that, the main challenge for me was to work boldly and quickly before the light changed (or the teachers called "time's up"). I am truly a studio painter at heart, used to taking my time with a painting over a period of weeks or even months. Among all my other workshop discoveries and new approaches, I now have better tools for making color sketches on site to take back to the studio and an increased capability to work quickly on early stages of a piece to produce greater unity and vitality.

     So far, I have completed just one of the works (see earlier post) started at the workshop, the largest I worked on there, and feel it differs from my other work in an interesting way. Other workshop pieces, though extremely useful as learning exercises, are unlikely to be worth further development. But above all, the growth and insights I brought home from the experience are valuable on many levels. Mary Jane and Kathie are a kind, inspiring, gifted teaching team for whom I am truly grateful.

Question of the day: How many of you also love life-long learning?

Thursday, June 30, 2016

"Overlooking Orange Lake", a Painting with Mimosa Tree

     The acrylic painting, "Overlooking Orange Lake", a scene which includes a mimosa tree, is complete after many months of being put away while I worked on other projects. I painted the first stage--the entire background and grassy foreground--at a wonderful two-day plein air workshop in May of 2015. I have searched this blog in vain for the post in which I told you all about that workshop. Oh my. That post never appeared, and I apologize for the omission; it was a complicated time for me. Since telling you about the workshop along with information about this particular painting would get too long, I will post in a few weeks about the two-day workshop itself and the excellent team of artists who taught it.

     Painting en plein air with acrylic paints was completely new to me and was difficult for several reasons. As a studio painter, I am used to taking my time and developing a painting carefully. Yes, what I paint is based on my personal adventures in beautiful coastal North Florida, but the outdoor time is spent observing in detail, making sketches, notes about color and atmosphere, and taking reference photos. Painting as quickly as plein air requires in order to capture the light and look of the moment was a real challenge for me--and an excellent learning experience. A second difficulty--or cluster of difficulties-- included the weather (heat and humidity in this case), wind (my work blew off the easel onto the grass at one point), bugs, etc. as well as constantly battling the quick drying time of acrylics with pared down equipment.

     So, it was a small victory to block in the entire scene and to cover this 14" x 18", 1 1/2" deep gallery-wrapped canvas with the underpainting in the short time allowed for this particular exercise on day two. The main benefit of painting en plein air is to observe a scene and paint at the same time. Thus, painters can capture precisely the colors and values as they see and experience them. I did not attempt to duplicate the exact colors and tones I saw, but worked to get the feel of the bright afternoon sizzling in an unseasonable heat with realistic colors in the range of the actual view. Another concern was to show atmospheric perspective in the painting, especially because Florida's flat terrain makes a "long view" a rare treat. It was important to me to give the viewer a feeling for the way I experienced looking out over Paynes Prairie to Orange Lake in the distance. 

      Beyond adding the mimosa tree (for which I had color sketches, but nothing on the canvas), very little else needed to be changed when I began working on this piece again (after a full year!). I added some detail and texture in the foreground and completed the clouds, deciding just to "punch up" the rest a little. Although there was a large mimosa tree in the actual scene, it did not stand alone like a sentinel as it does in the painting. I left out some scrubby saplings and other tangled growth to provide this personal interpretation of that North Florida day. 

Question of the day: What experiences have you had either observing painters working en plein air or painting outside yourself?     

Saturday, May 28, 2016

Visiting the Jacksonville Arboretum and Gardens

     
     A few weeks ago, we hit the trails in the delightful Jacksonville Arboretum and Gardens, a lovely, varied nature preserve reclaimed from the edge of a former waste dump. Husband Mark, a Master gardener, participated in the cleanup and some of the replanting--all of which has transformed this into a precious natural educational and recreational spot.

     Opened in 2008, the Arboretum includes 120 acres with 13 distinct ecosystems. As we and Maggie, our little Shih-tzu, explored the lake, one of the streams, part of the lower ravine trail and more, we experienced the tranquility and easy companionship of time walking outdoors.


     When I posted about the Arboretum a few years ago, I was gaining strength in my first artificial hip. This time, I was enjoying even better mobility (and no pain!) breaking in the second hip. There is a great deal to be thankful for.

     This weekend, I am also grateful to live in such a gorgeous area here on the North Florida Atlantic Ocean coast. We will walk wide beaches and maybe splash in the surf without needing to travel at all. 

     As we enjoy North Florida's beauty this Memorial Day weekend, we will sincerely give thanks for all who have served--and who currently serve--in all branches of the U. S. military and for the sacrifices their families make as well. 


Question of the Day: How are you observing Memorial Day and celebrating your holiday this year?


Sunday, March 13, 2016

Three Hand-dyed and Painted Silk Scarves

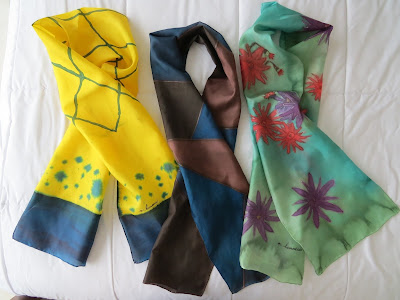
     Although I have enjoyed making 22" x 22" square scarves (earlier scarf posts here), I wanted to make long scarves even more. However, it took awhile until I had room for the long stretching frame required to work on them. Here are the first to be completely finished; each measures 11" x 60". 

     Each one was an experiment, as I am still a learner in this art form. The yellow and dark blue scarf was free-painted with no resist to separate areas of color from one another. I first painted the entire scarf deep yellow, let it dry, and then lightly sketched the lattice design in water soluble fabric pencil before painting several layers of deep blue dye in all pattern areas.

     Gutta resist defined the patterns on the other two. The brown, turquoise, and blue color-block scarf first got a coat of very light (watered down) brown overall. Once it was dry, I used a water soluble fabric pencil to mark off the areas according to a scale model design I had sketched out ahead of time. I followed the lines with gutta resist, applied fairly thickly, and let that dry well. Finally, several layers of each color filled the blocks according to my plan. I am pleased with the design and plan to make it again in different colors, maybe pink, rose, blue, and purple.

     The flower design began differently with free-form flowers brushed on the white scarf. Then, I outlined the designs with gutta, staying mostly on the edges of dyed areas to avoid all-white outlines. I deepened the colors within the lines and added a few extra details in the petals and centers. The blue and green background was the last step and gave me fits because of some wayward drips and streaks. Once dye is on the silk, it is there to stay--virtually impossible to remove without streaking the areas around it. So, I gathered up my courage and tried brushing on just water to blend everything, adding just a bit of dye to vary and blend the background colors. Whew! It turned out pretty well compared to the earlier unsightly spots.

     If readers are interested, I will post more in the future about the various finishing steps involved in steam-setting the French dye colors, removing the sticky gutta, washing and ironing the completed scarves.


Question of the day: Do you enjoy experimenting with new crafts or art forms--even the painful parts of watching things go wrong and learning from the process?

Tuesday, February 23, 2016

Painting of the Sun Rising Over the Ocean

     The painting of the sun rising over the Atlantic Ocean at Jacksonville Beach, Florida is finished, delivered, and now hangs in the master bedroom in the Jacksonville Beach home of our younger son and his wife. They are truly thrilled with it which is extremely gratifying to me after many hours working to make "Here Comes the Sun" all that they--and I--had hoped for. The piece is in acrylic paint on a 30" x 40" gallery-wrapped canvas. 


     For some background on the original request from them and the reference photos used, see an earlier post about creating a painting to coordinate with a room's decor. I was touched and honored by their faith in me. I was also more than a little scared to undertake the largest painting I had tried so far as well as facing the difficulty involved in painting a realistic sunrise (not overdone or cheesy). The result truly pleases me. If it hadn't worked out for their home, I would have placed the piece in one of the local shops that exhibits my work. That fallback plan reassured me during the process.

     The photos show the painting in their bedroom (taken in the evening) both with overhead lighting and then with softer lighting from side lamps as well as the painting alone against their golden-yellow wall.


     I apologize for the gap between my last post and this one and will try to write entries on a more regular basis again. I have completed three new hand painted silk scarves for you to see as soon as they are pressed and ready for a photo session. All my best to fellow creators, fellow bloggers, and faithful readers of this blog.

Question of the day: Have you taken on any particularly challenging projects creating art or craft pieces for people you love?